Contents
- Resources
- Introduction
- Granting Gmail permissions in Google Cloud Platform
- Call Gmail API (OAuth 2.0) by PHP programming language
- Call Gmail API (OAuth 2.0) by Python programming language
- Exercises
- Further Reading
Resources
Introduction
In this tutorial, we will show you how to set-up and sending emails with Gmail by using OAuth 2.0 authentication method, instead of the plain text authentication. We organize this tutorial into two sections:
1. Granting Gmail permissions in Google Cloud Platform
The Gmail API is a RESTful API that can be used to access Gmail mailboxes and send mail. For most web applications the Gmail API is the best choice for authorized access to a user's Gmail data and is suitable for various applications, such as:
- Read-only mail extraction, indexing, and backup
- Automated or programmatic message sending
- Email account migration
- Email organization including filtering and sorting of messages
- Standardization of email signatures across an organization
Before working with Gmail API, we first need to set-up a Google Cloud project for your Google Workspace app, extension, or integration such as Gmail, Drive, and Chat. Each Workspace app or integration has its own Google Cloud project where you configure APIs, set up authentication, and manage deployments. A full tutorial to work with other Google Workspace apps is available at this page.
The following steps will show you how to create, set-up your project on Google Cloud Platform.
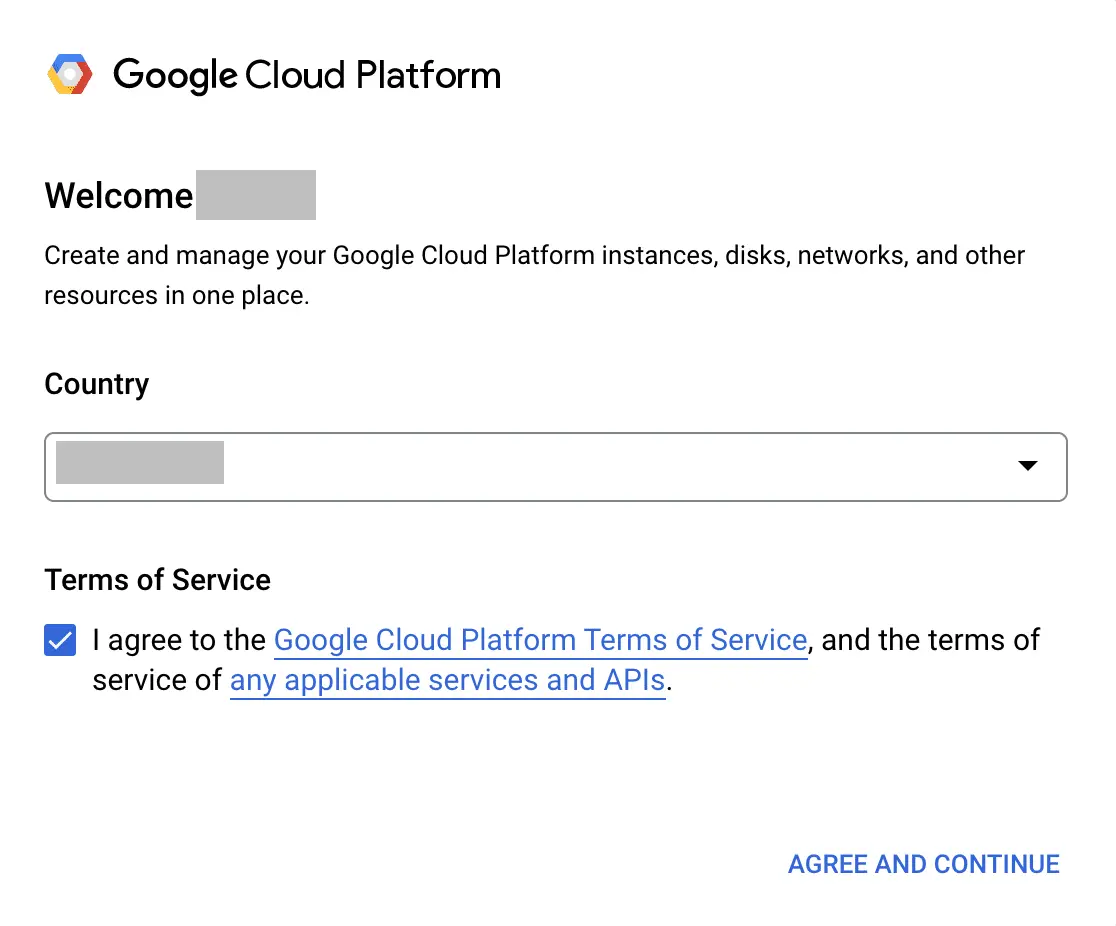
- Log-in to Google Cloud Platform at this page https://console.cloud.google.com/home/dashboard. You should notice that your account must have a permission to send/receive emails if you are using your work account, we thus recommend that you should use your personal email address (username@gmail.com). If this is your first time using Google Cloud Console, you may see a pop-up window asking you to select your country and agree to the ToS, as shown in below figure.
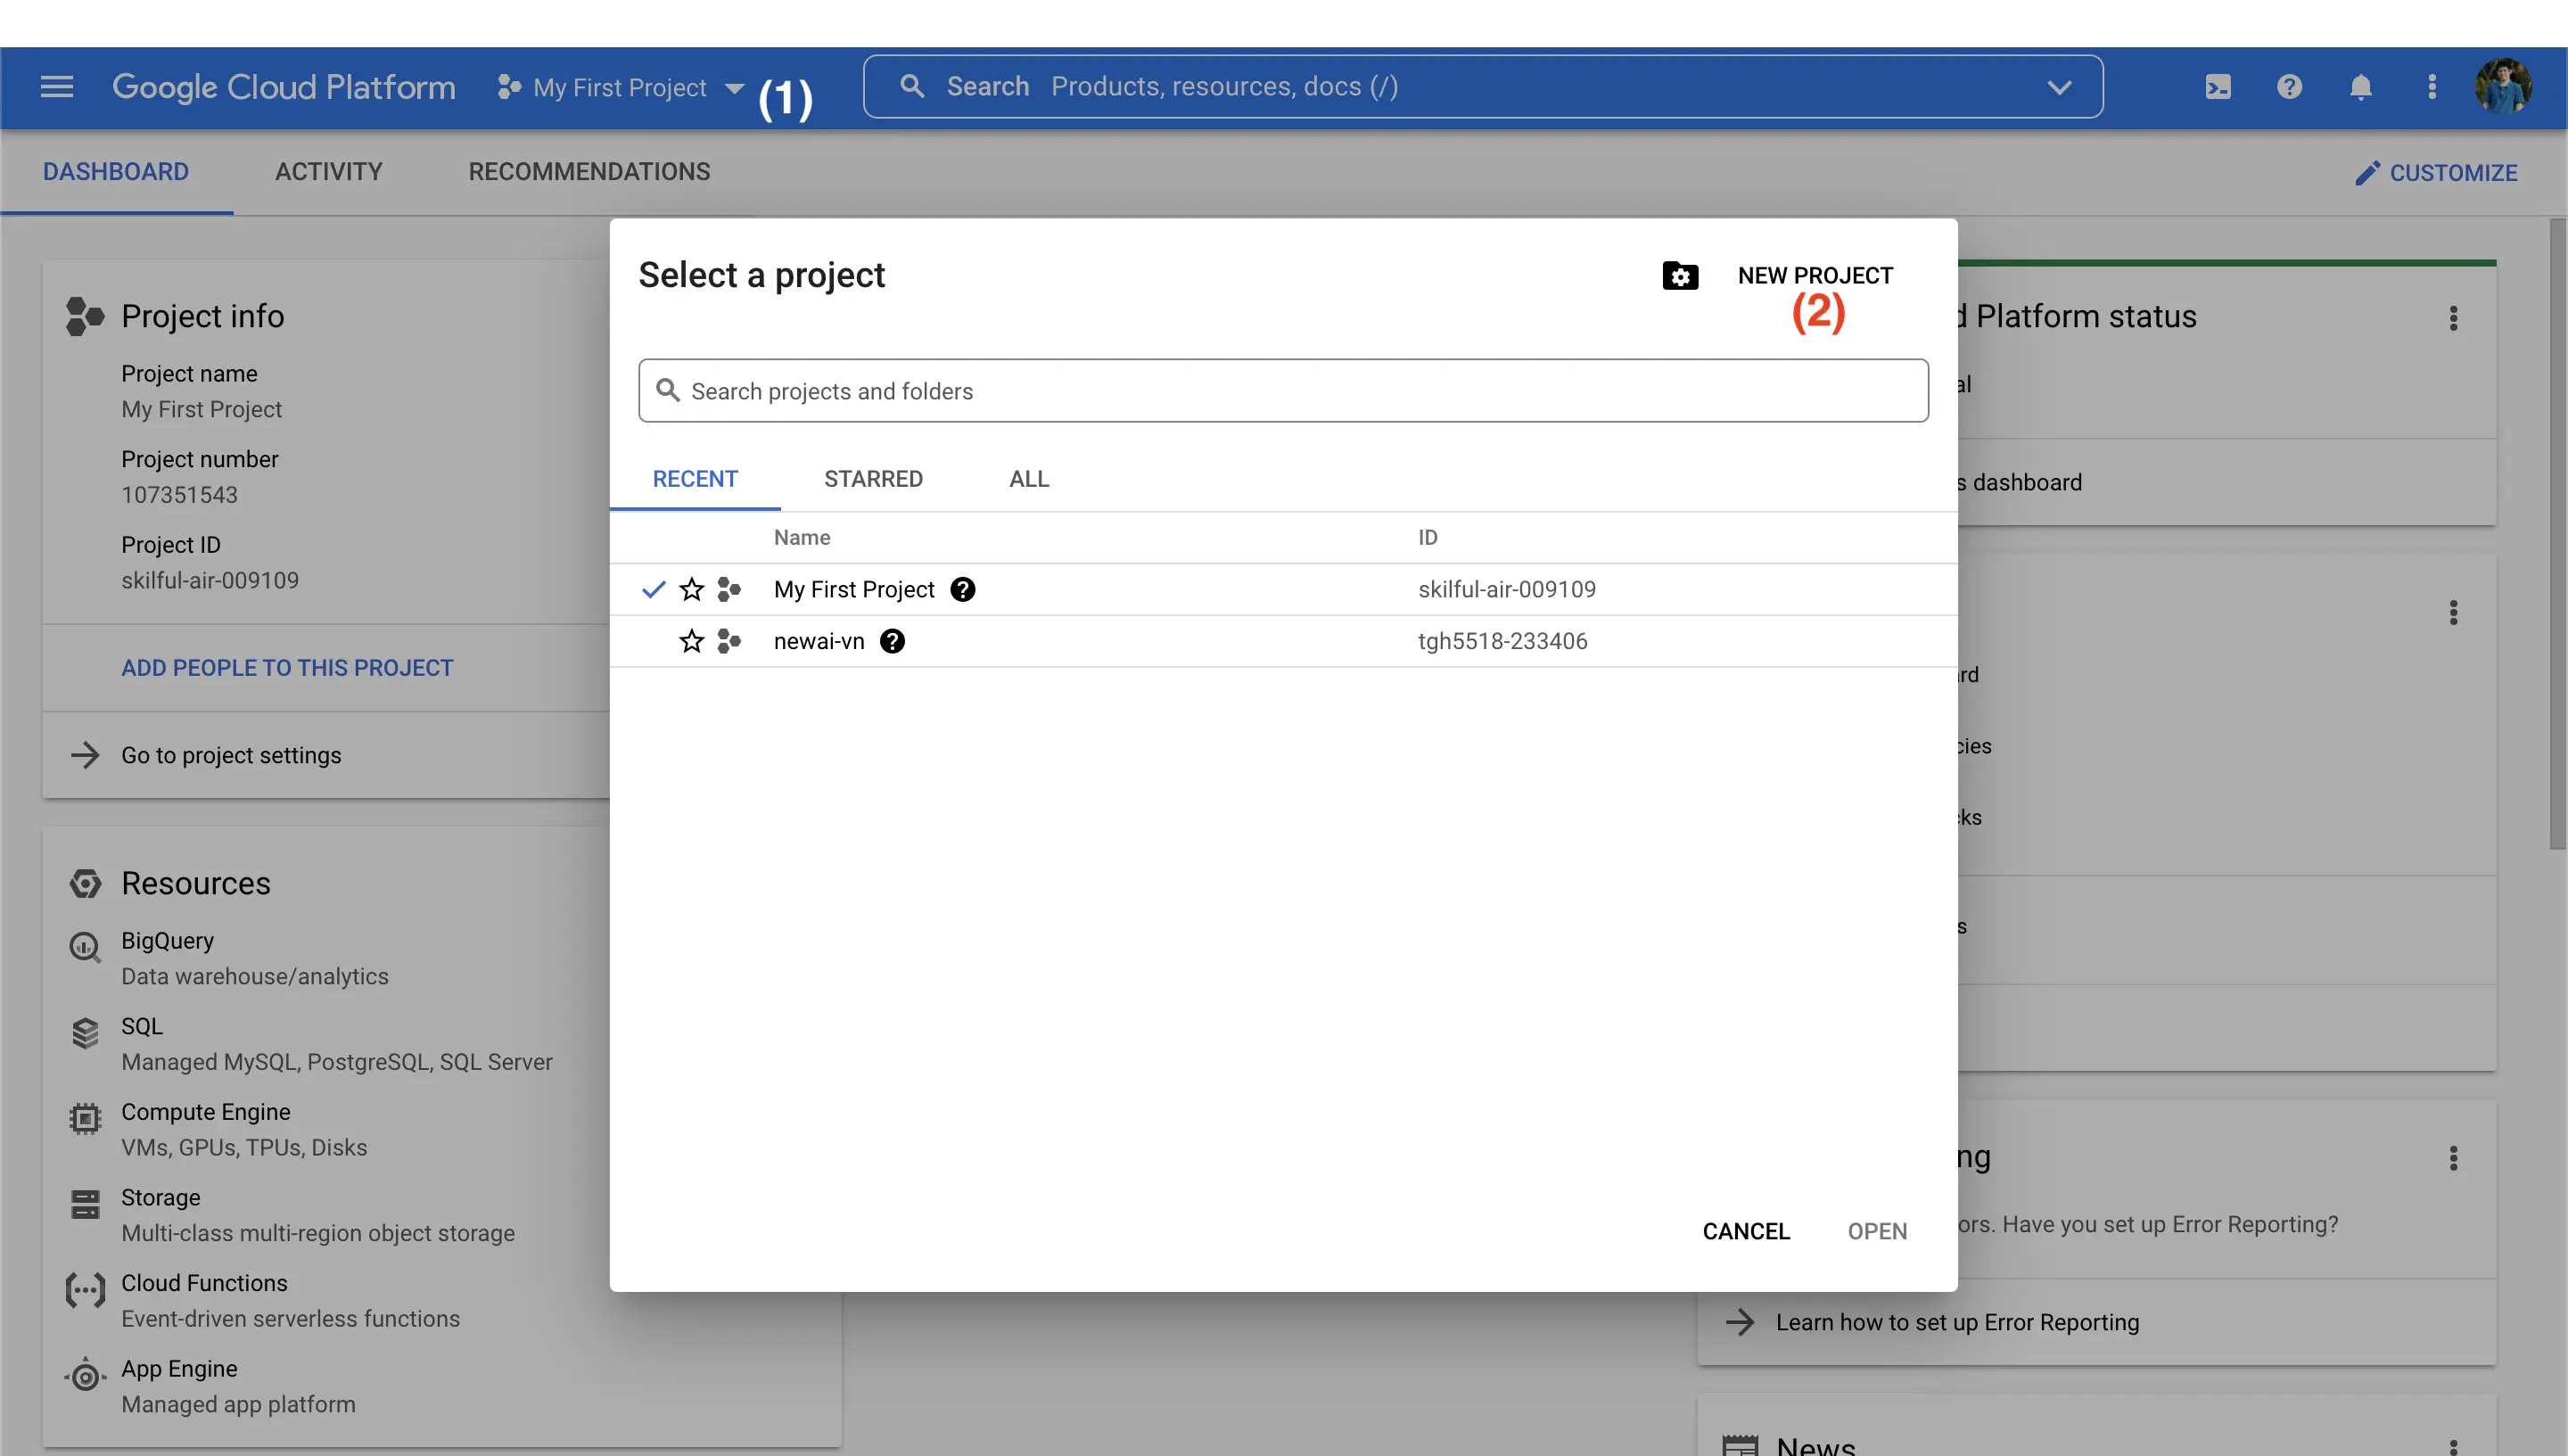
- Next step, you will create a new project or select an existing one. In this tutorial, we will show you how to create a new project. To do so, you first click My Project at the top toolbar, and then select New Project in a pop-up window, as shown in below figure.
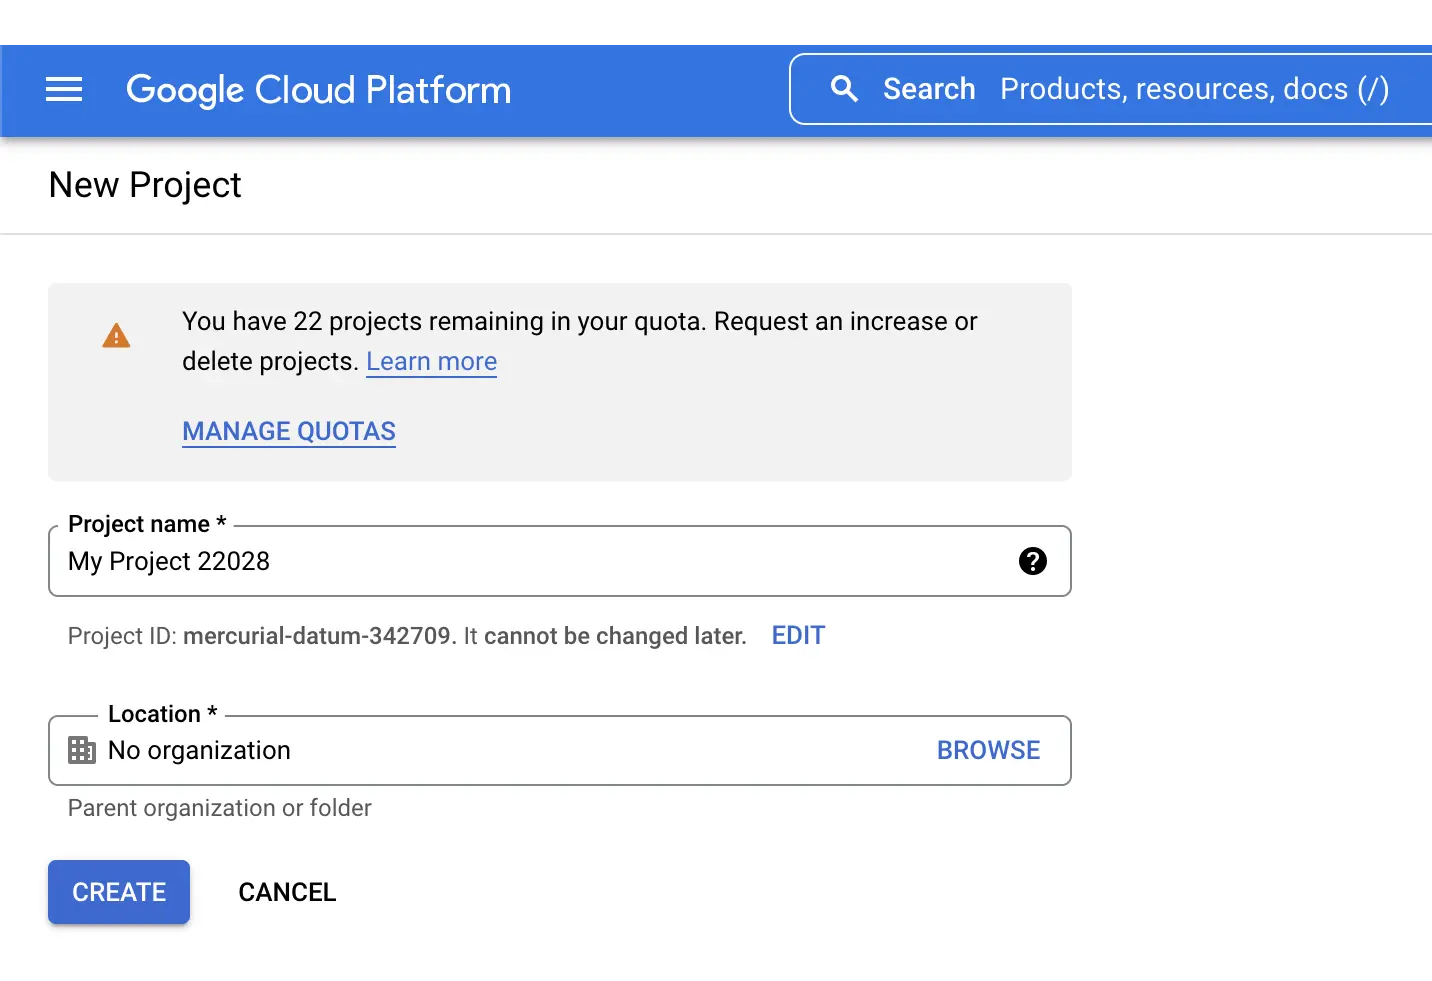
- After selecting New Project in above step, you will be moved to a new webpage to enter your project name and location, as shown in Fig. 3. You should enter a project name that is recognizable later. Then, select "Create" button. Fig. 4 presents the result after creating a new project.
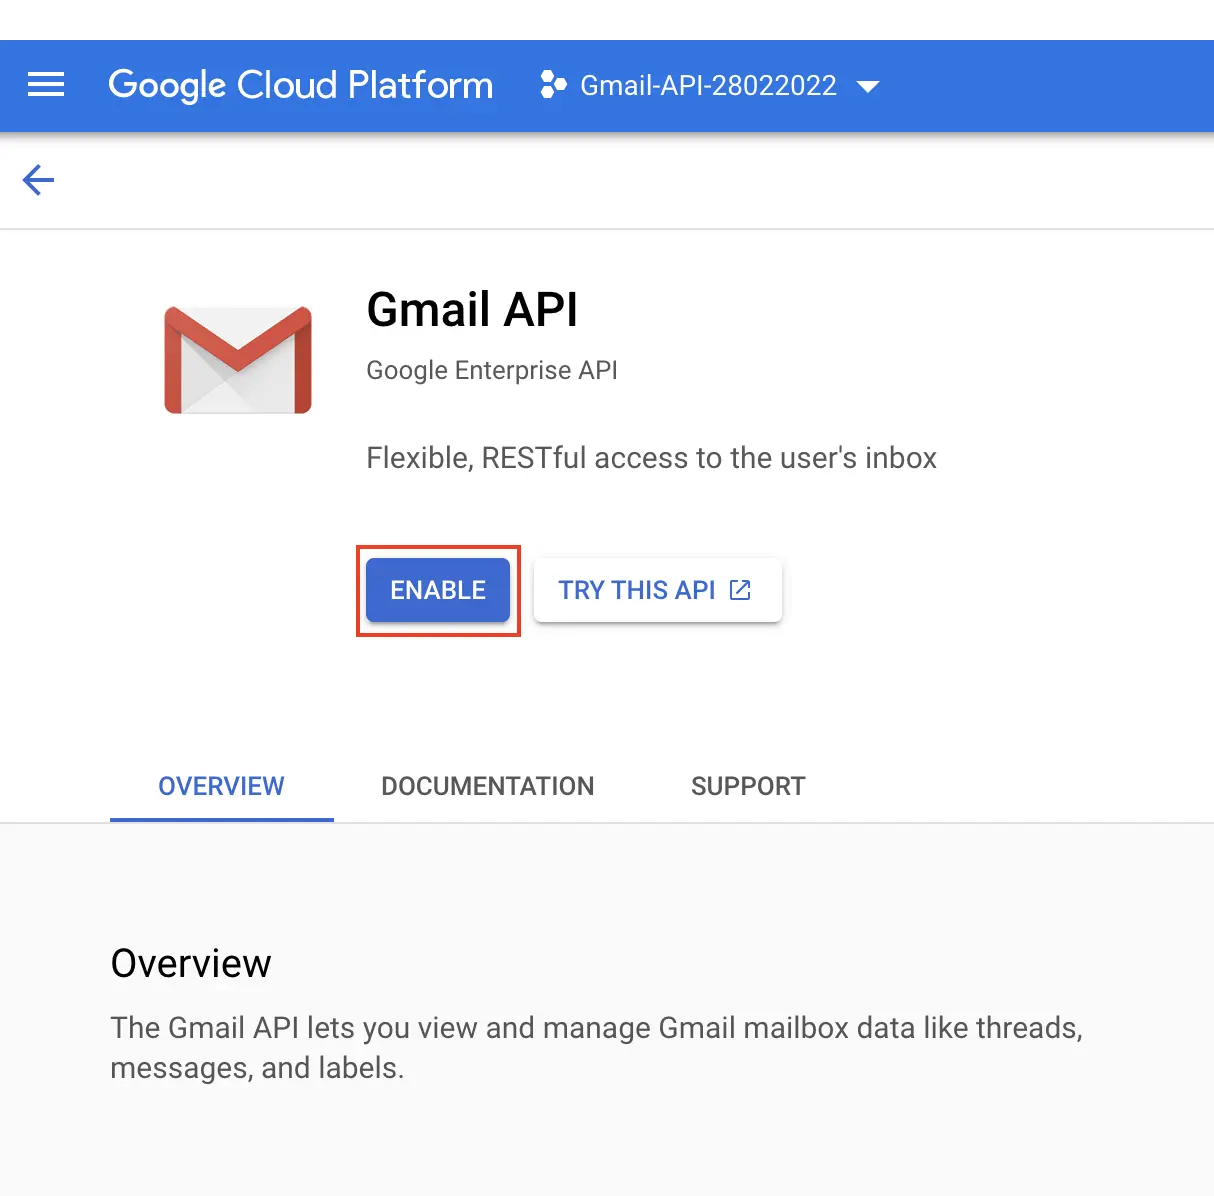
- Enable the Gmail API — In Google Cloud Console sidebar, go to APIs & Services → Library to open API Library webpage, select Gmail API in Google Workspace section, and then select Enable button, as shown in Fig. 5 and 6.
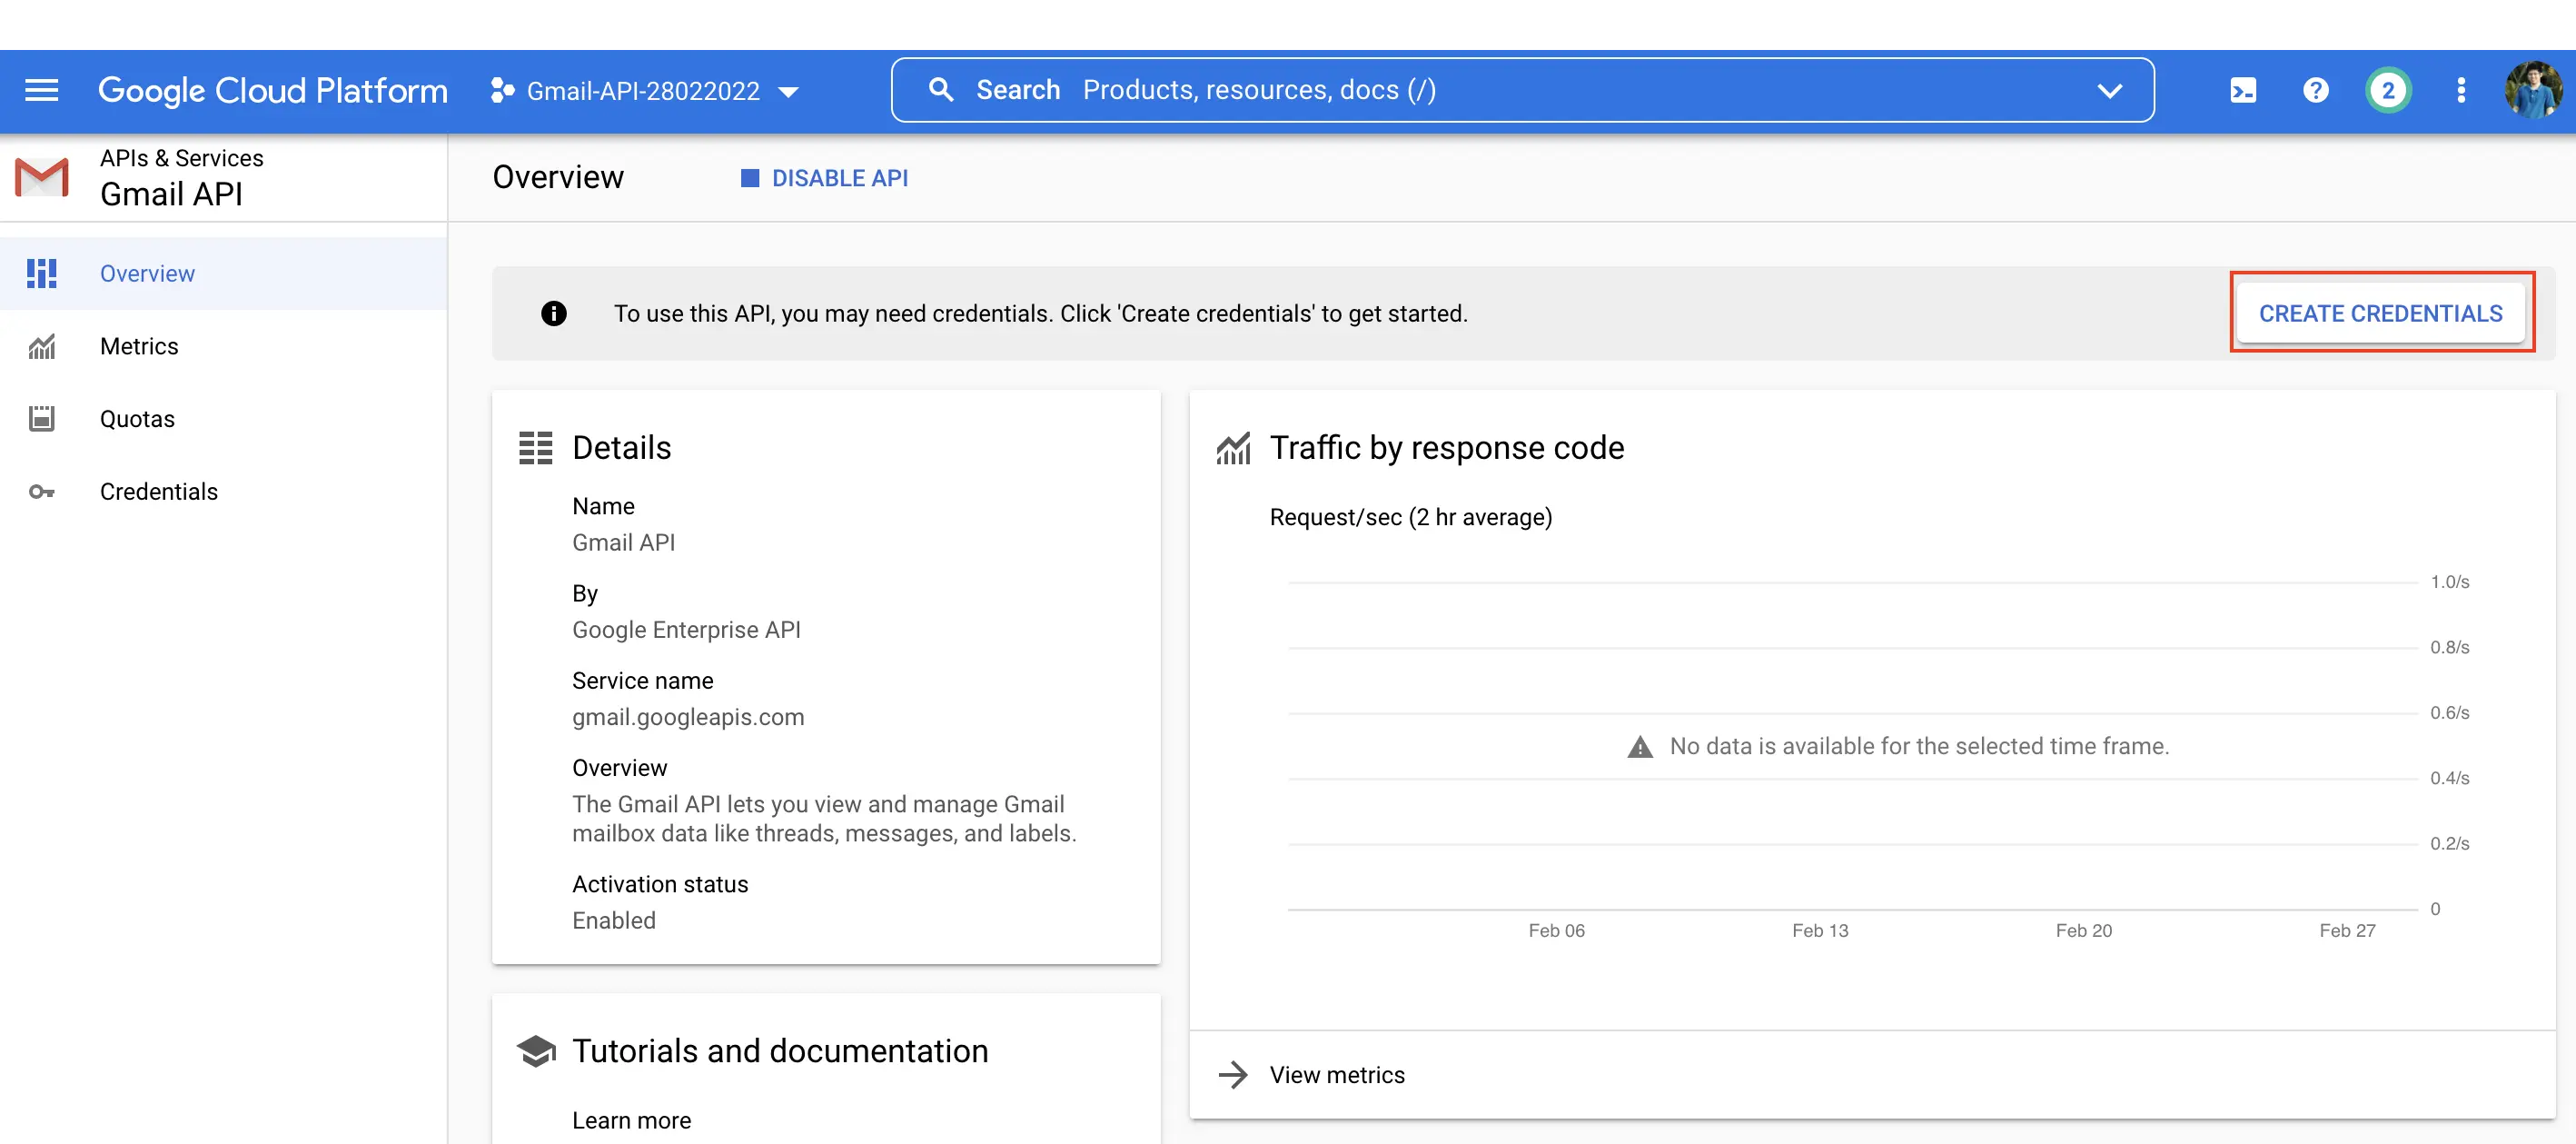
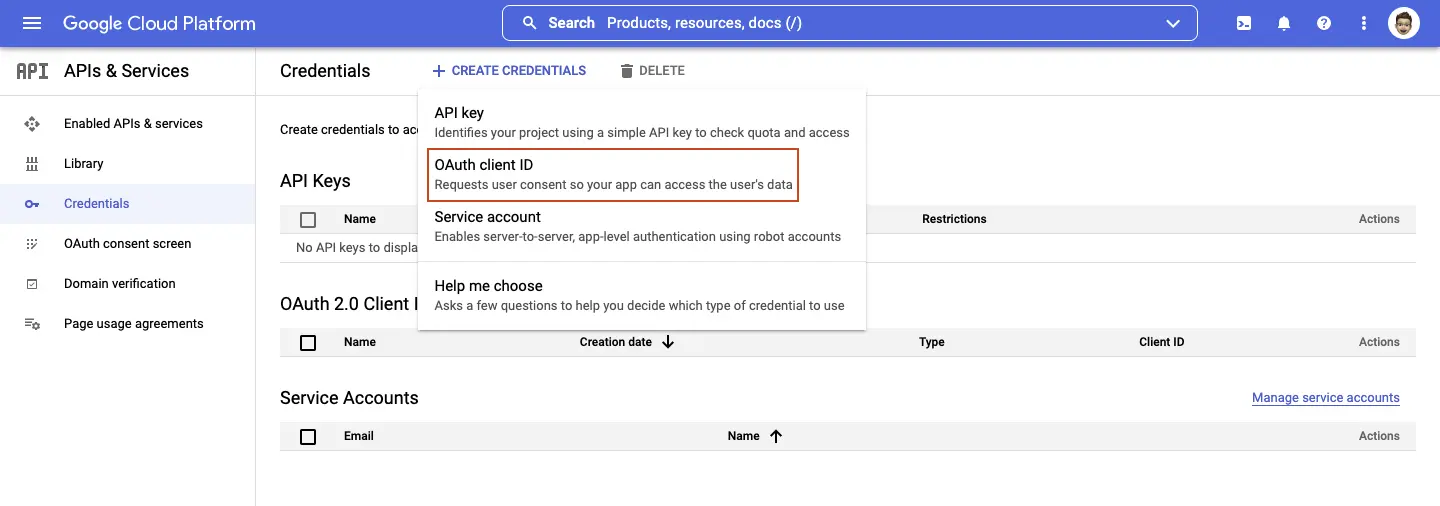
- Creating Application's Credentials — After you enable the Gmail API, you will be redirected to the Gmail API Overview page. Then, on this page, click on the Create Credentials button, as shown in Fig. 7.
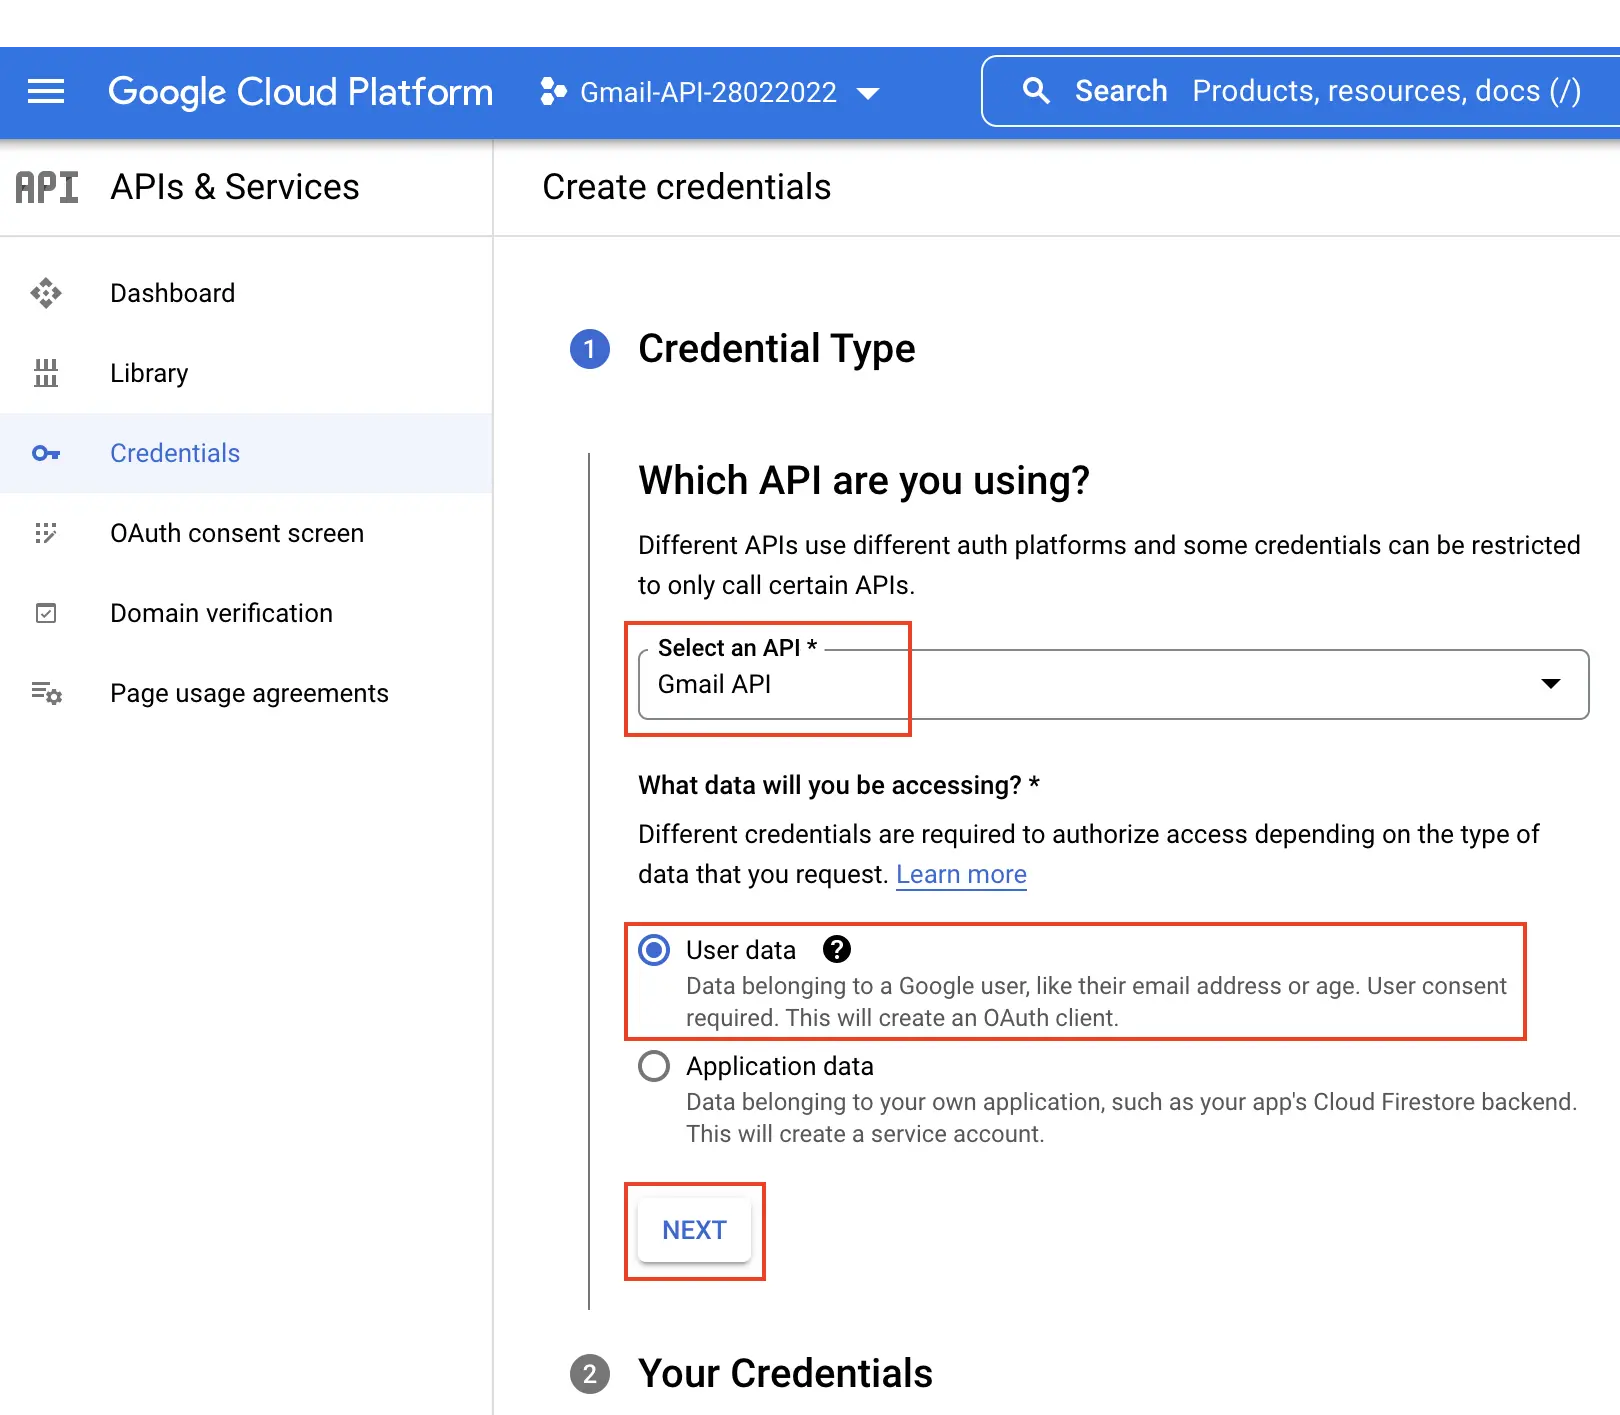
- On the next page, choose Gmail API in Select an API dropdown box, and select User data option under What data will you be accessing? question. Then, click Next button.
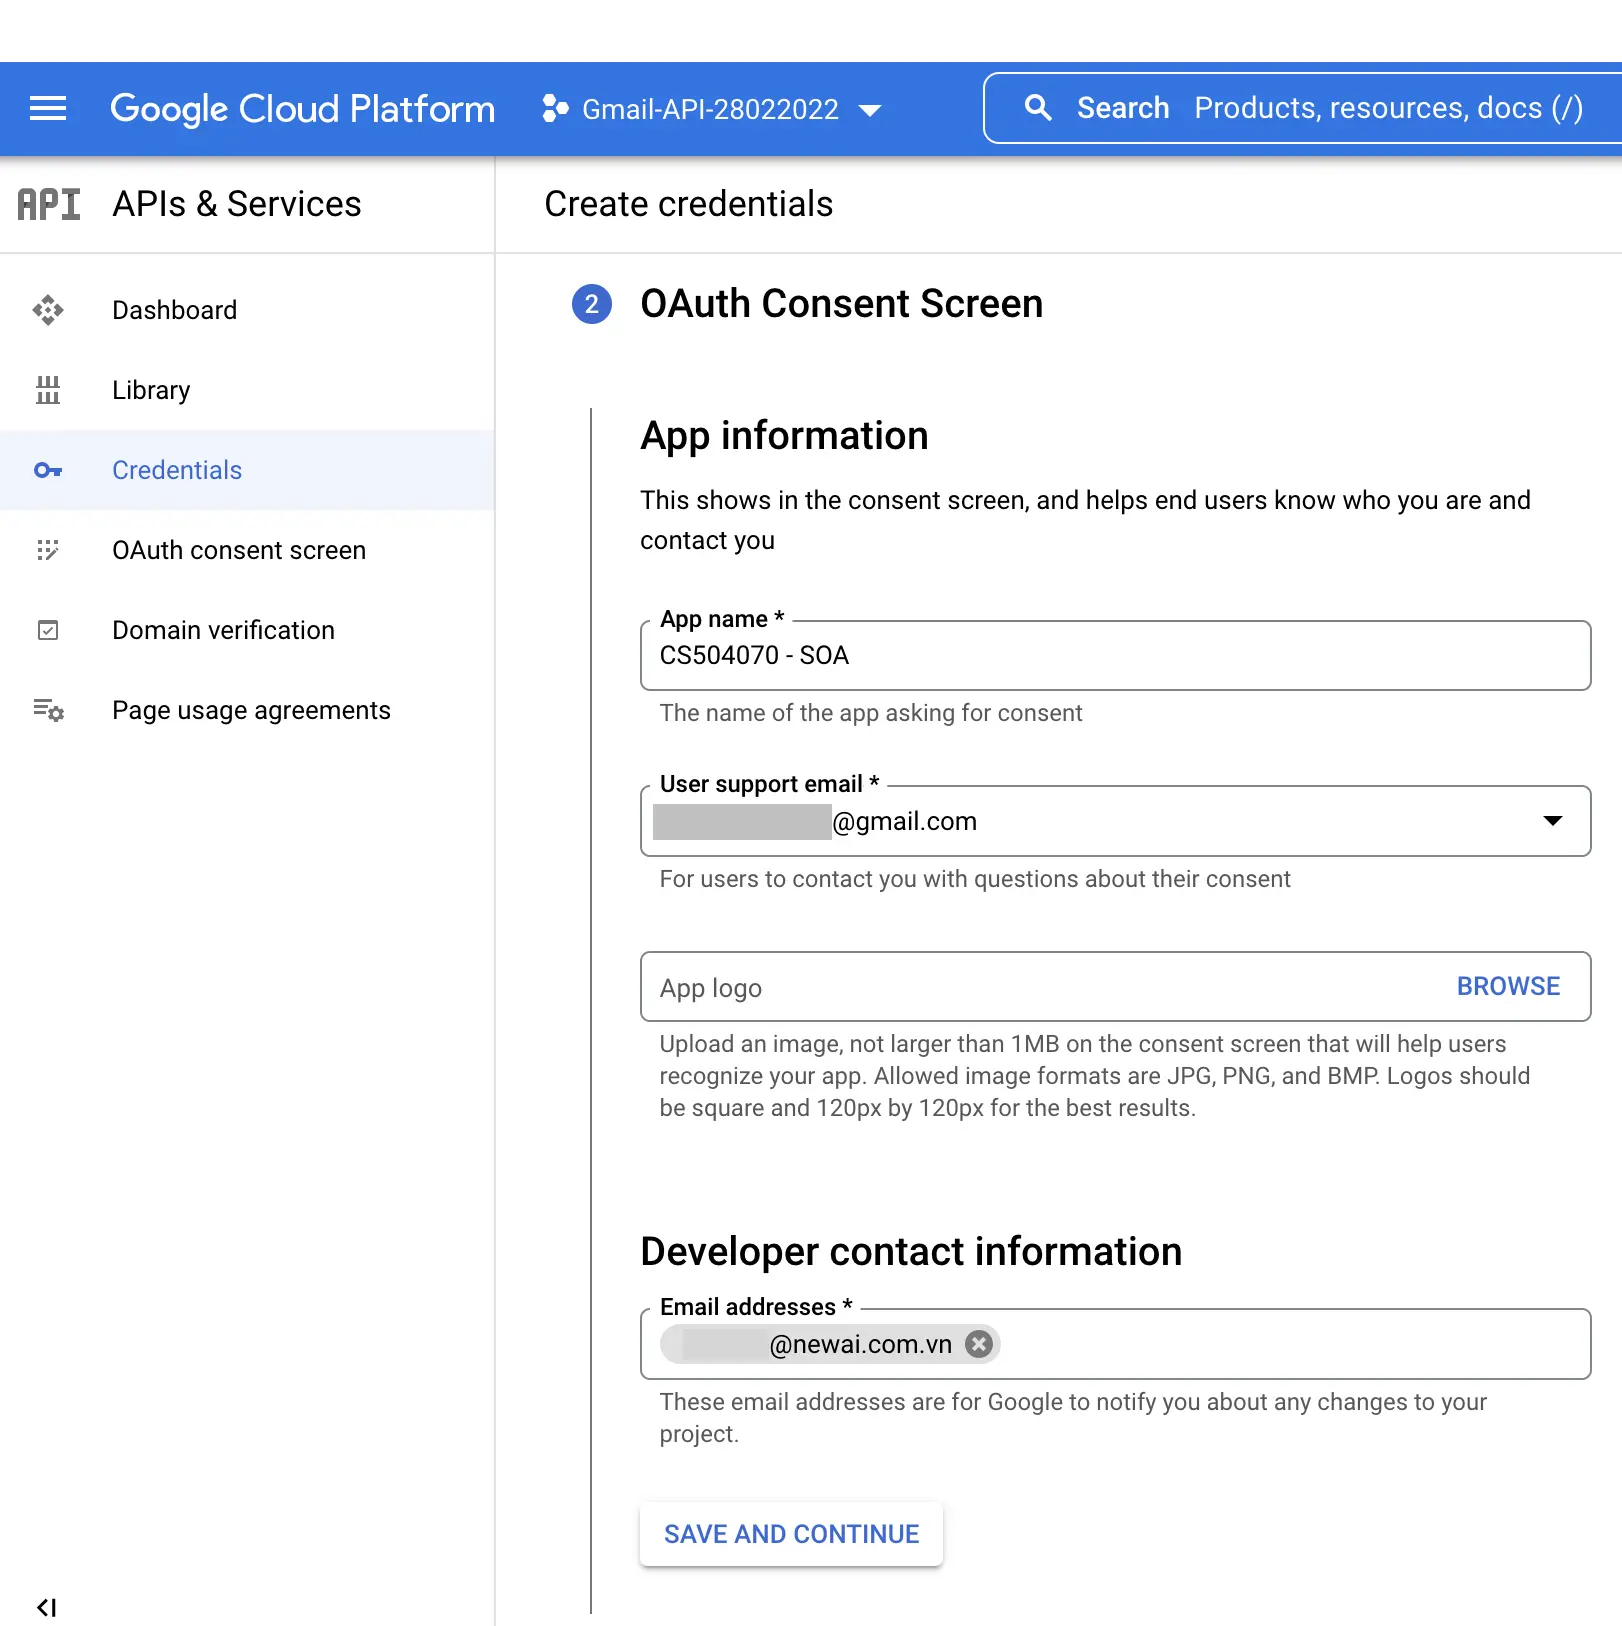
- Configuring OAuth Consent Screen — This section is mostly for an application which is publicly available for other users. Although you configure this Gmail API for personal use, you need to enter information since some fields are still marked as required, as shown in below figure. Then, click on the Save and Continue button to proceed to the next step.
- Setting up Scope — You can skip the Scopes configuration, since this is an optional step, and you also can configure this after creating credentials. Just click on the Save and Continue button to proceed to the next step.
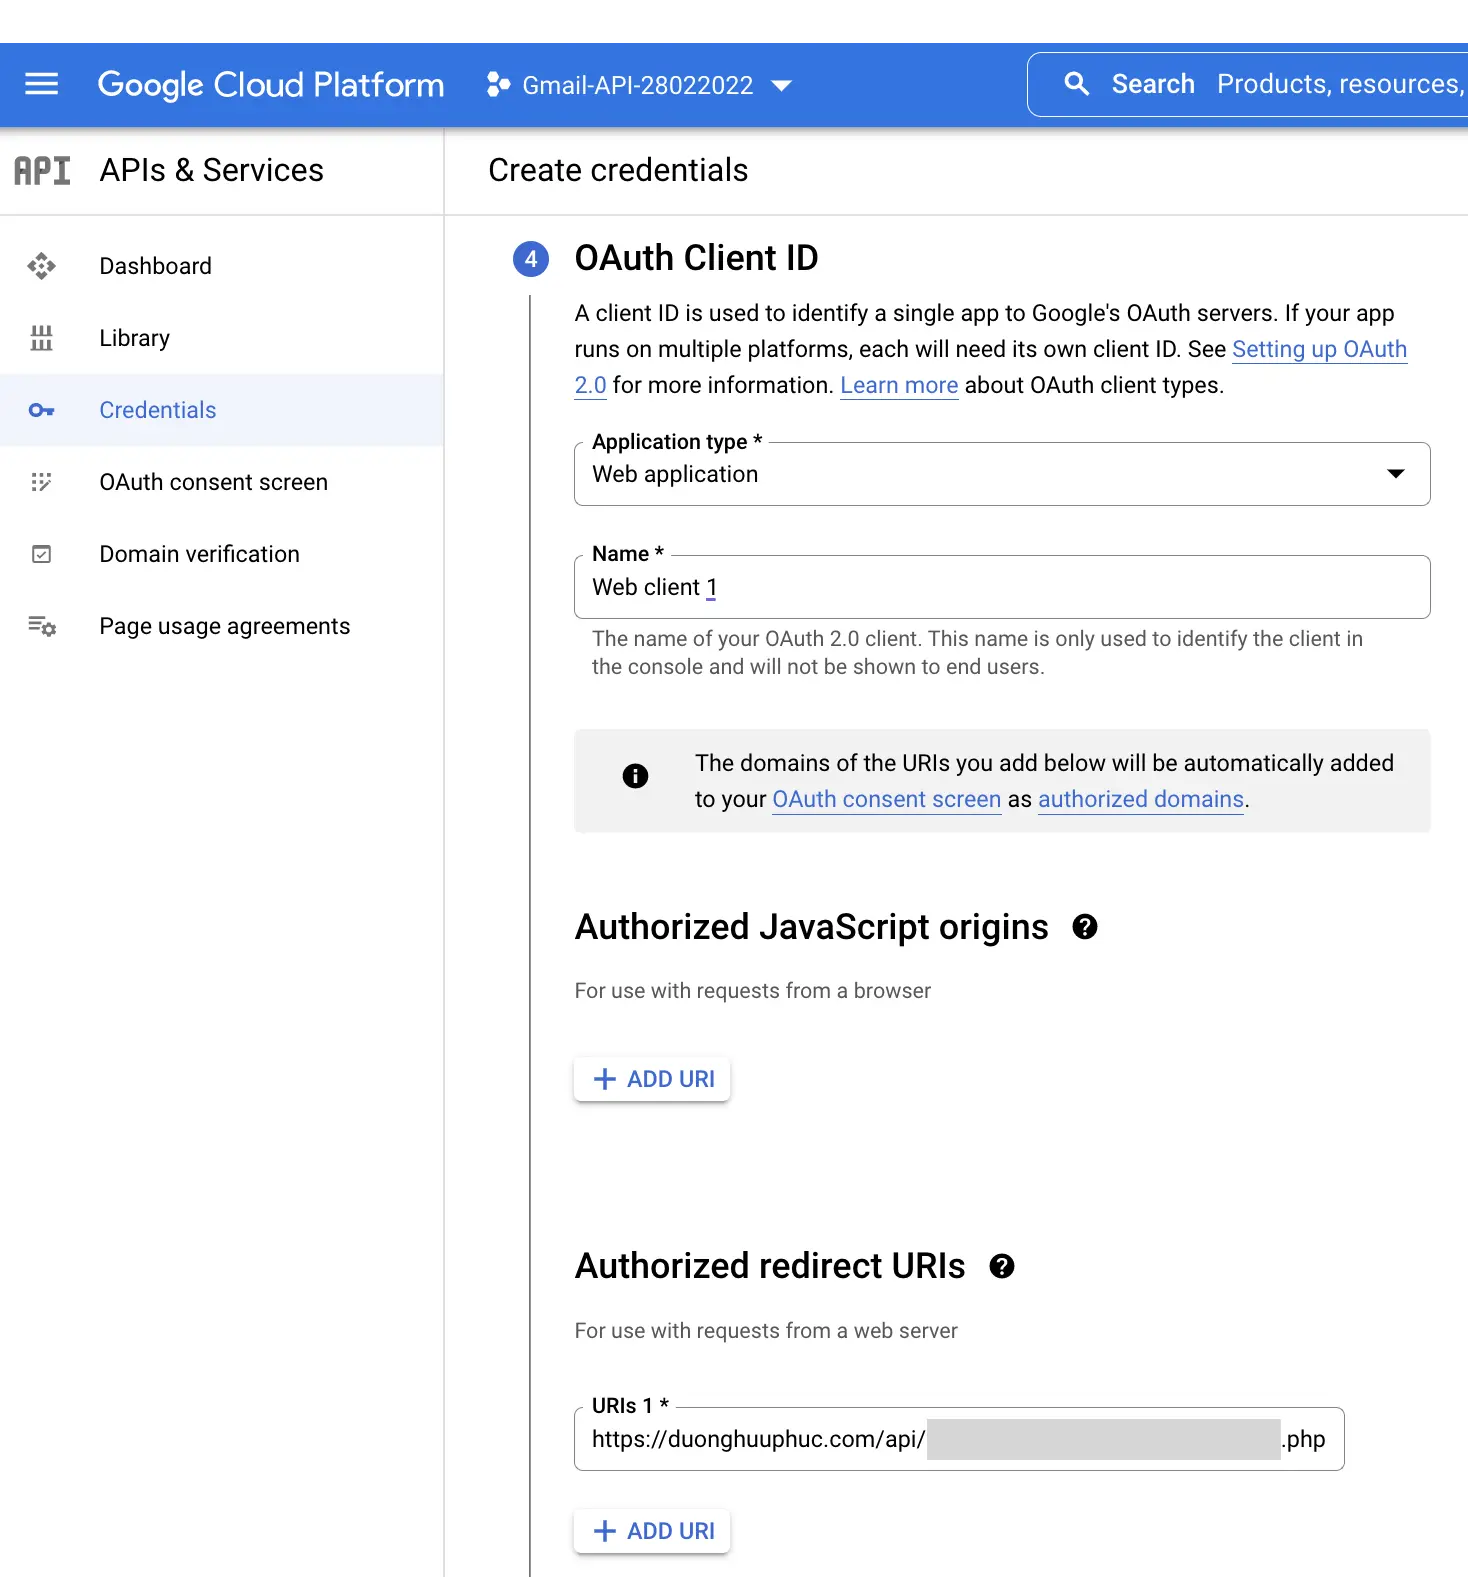
- Setting up OAuth Client ID — In this step, you will fill in some information about your OAuth Client ID, as shown in Fig. 10. First, you need to select Web application option from the Application type dropdown box. Second, you can leave the Name field as default, or enter your desired one. Third, you can skip the Authorized JavaScript origins section and scroll to Authorized redirect URIs. Fourth, click the + Add URI button and specify Authorized redirect URIs. The redirect URIs are the endpoints to which the OAuth 2.0 server can send responses. These endpoints must adhere to Google's validation rules. For testing, you can specify URIs that refer to the local machine, such as
http://localhost:8080. To configure Authorized redirect URIs in production environment, you can download this sample file [get_oauth_token.php] and upload it to a public server (HTTPS required). We note that this file must be placed in an Apache server with Google OAuth 2.0 dependency for the PHP League's OAuth 2.0 Client which can be installed via PHP Composer. Finally, click Create button. - Once your application has been created, Your Credentials section will open to show you your Client ID, as shown in below figure. You should keep this Client ID secret. You can now click Done button at the bottom of the page.
- Get Client ID and Client Secret — On APIs & Services dashboard, select Credentials in the left-sidebar. Then, in the OAuth 2.0 Client IDs section, click the pencil icon in Actions column to view the Client ID and Client Secret, as shown in below figure.
- Granting Gmail API Permission — As mentioned in Setting up OAuth Client ID section, the get_oauth_token.php on a webserver is our configured Authorized redirect URI. However, there are two missing values in the file which are
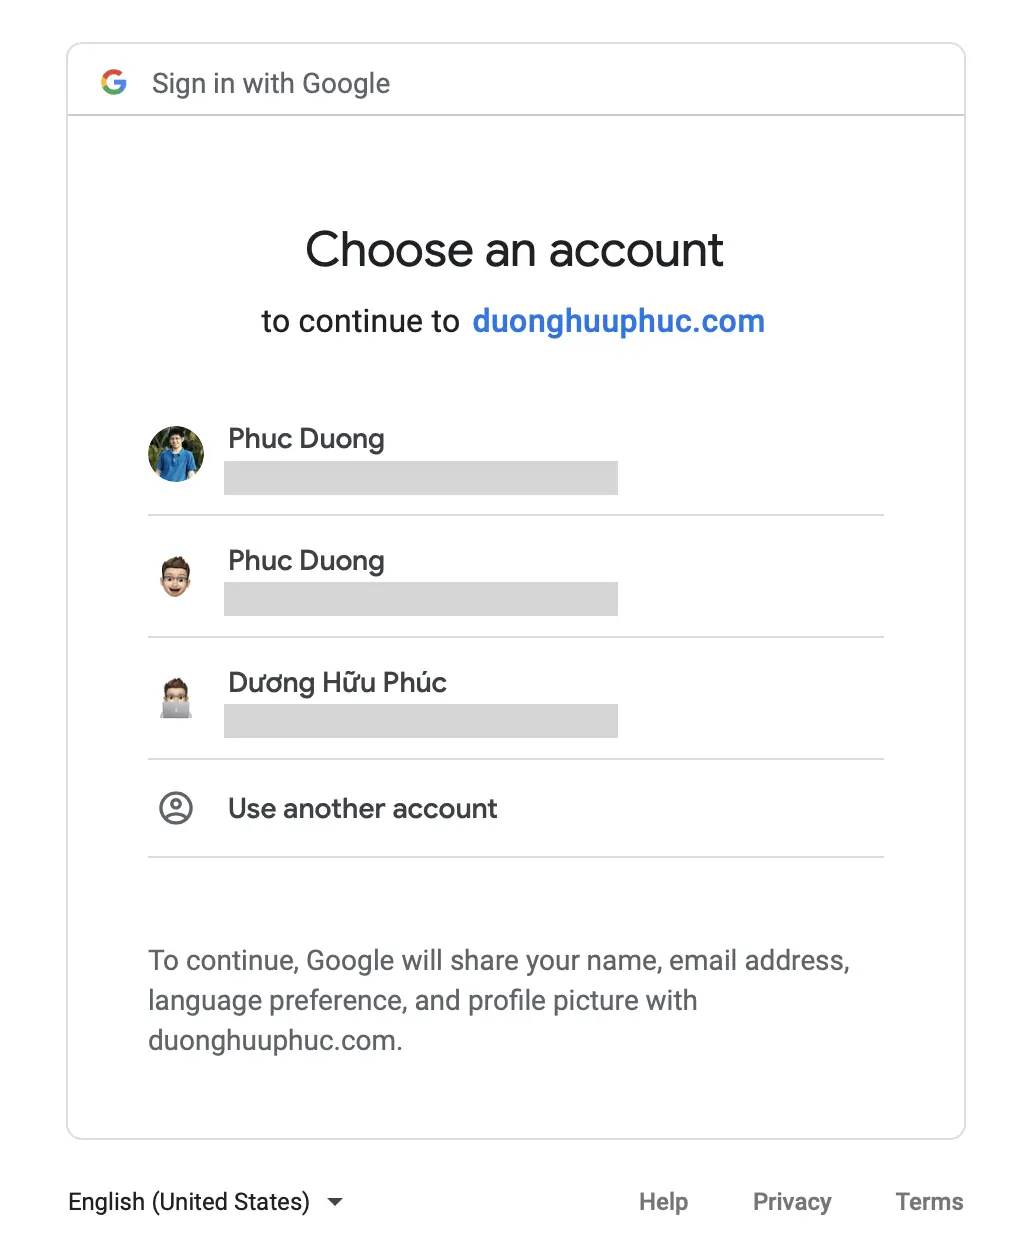
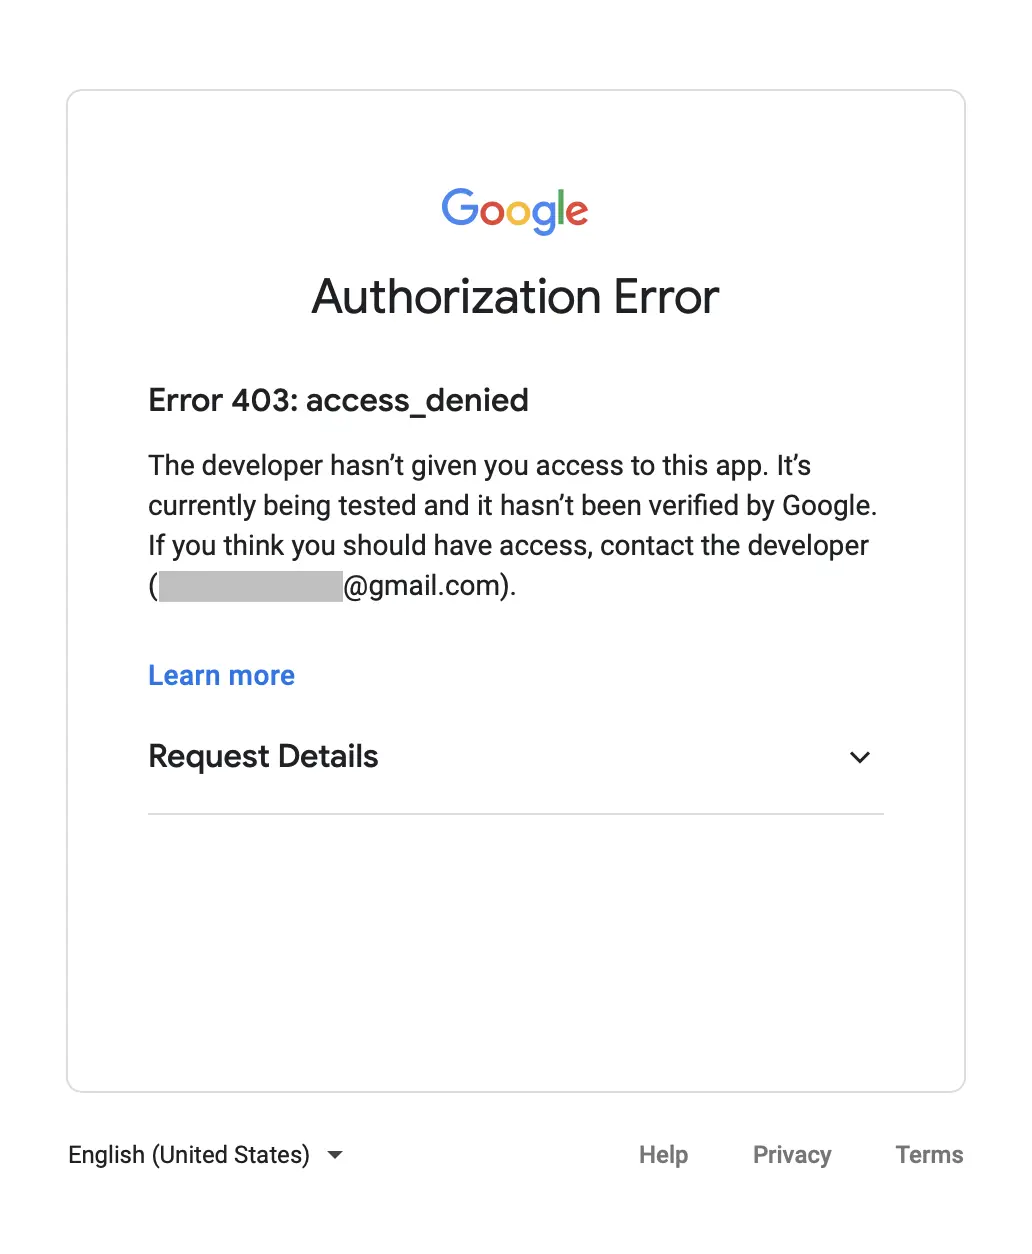
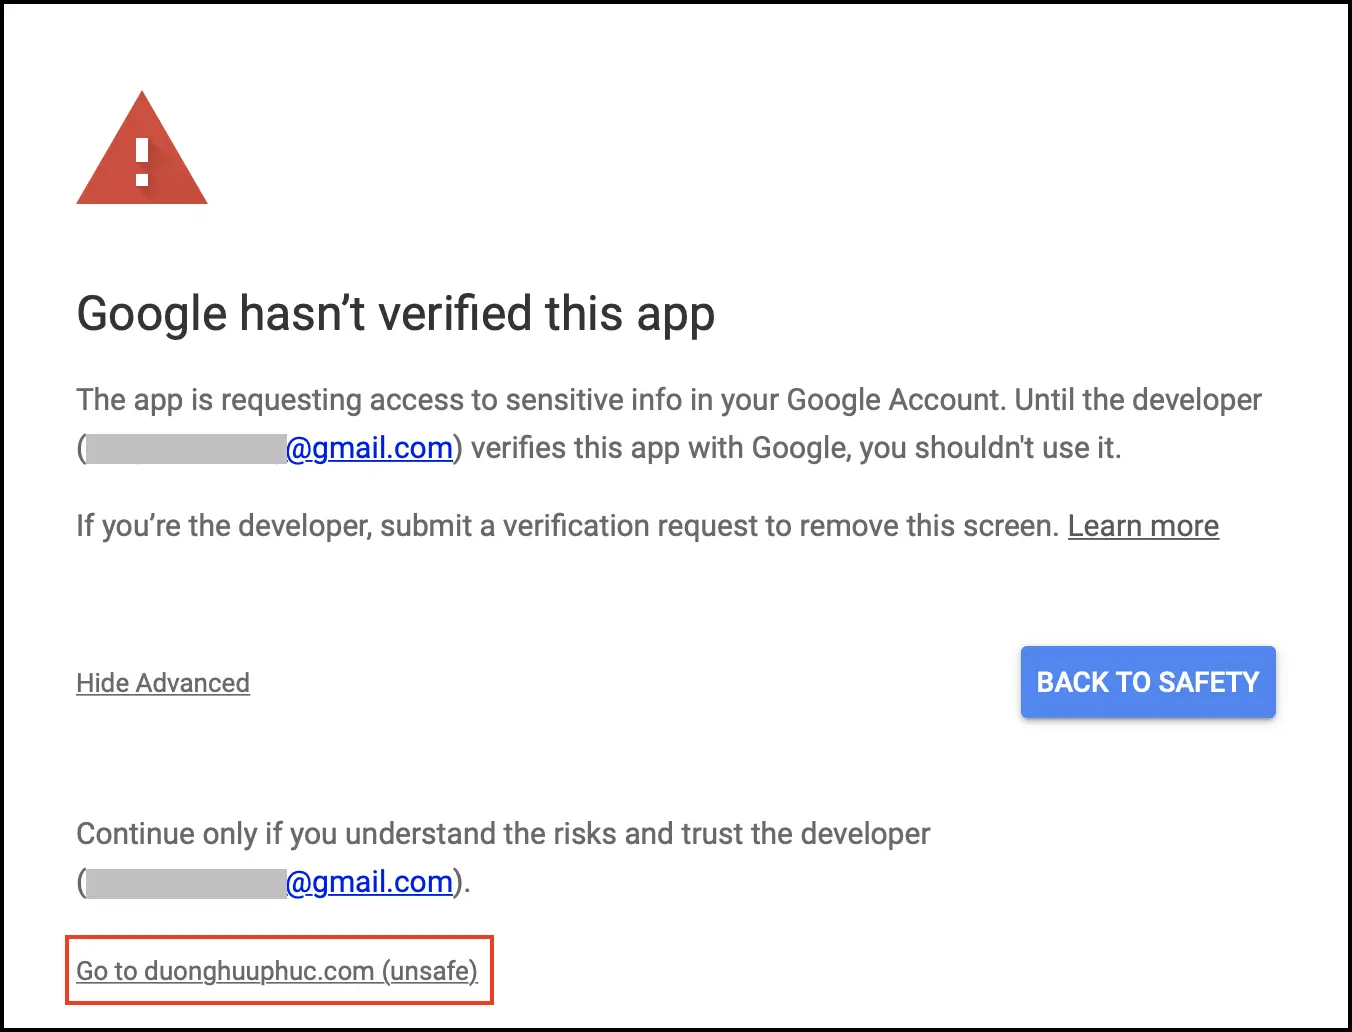
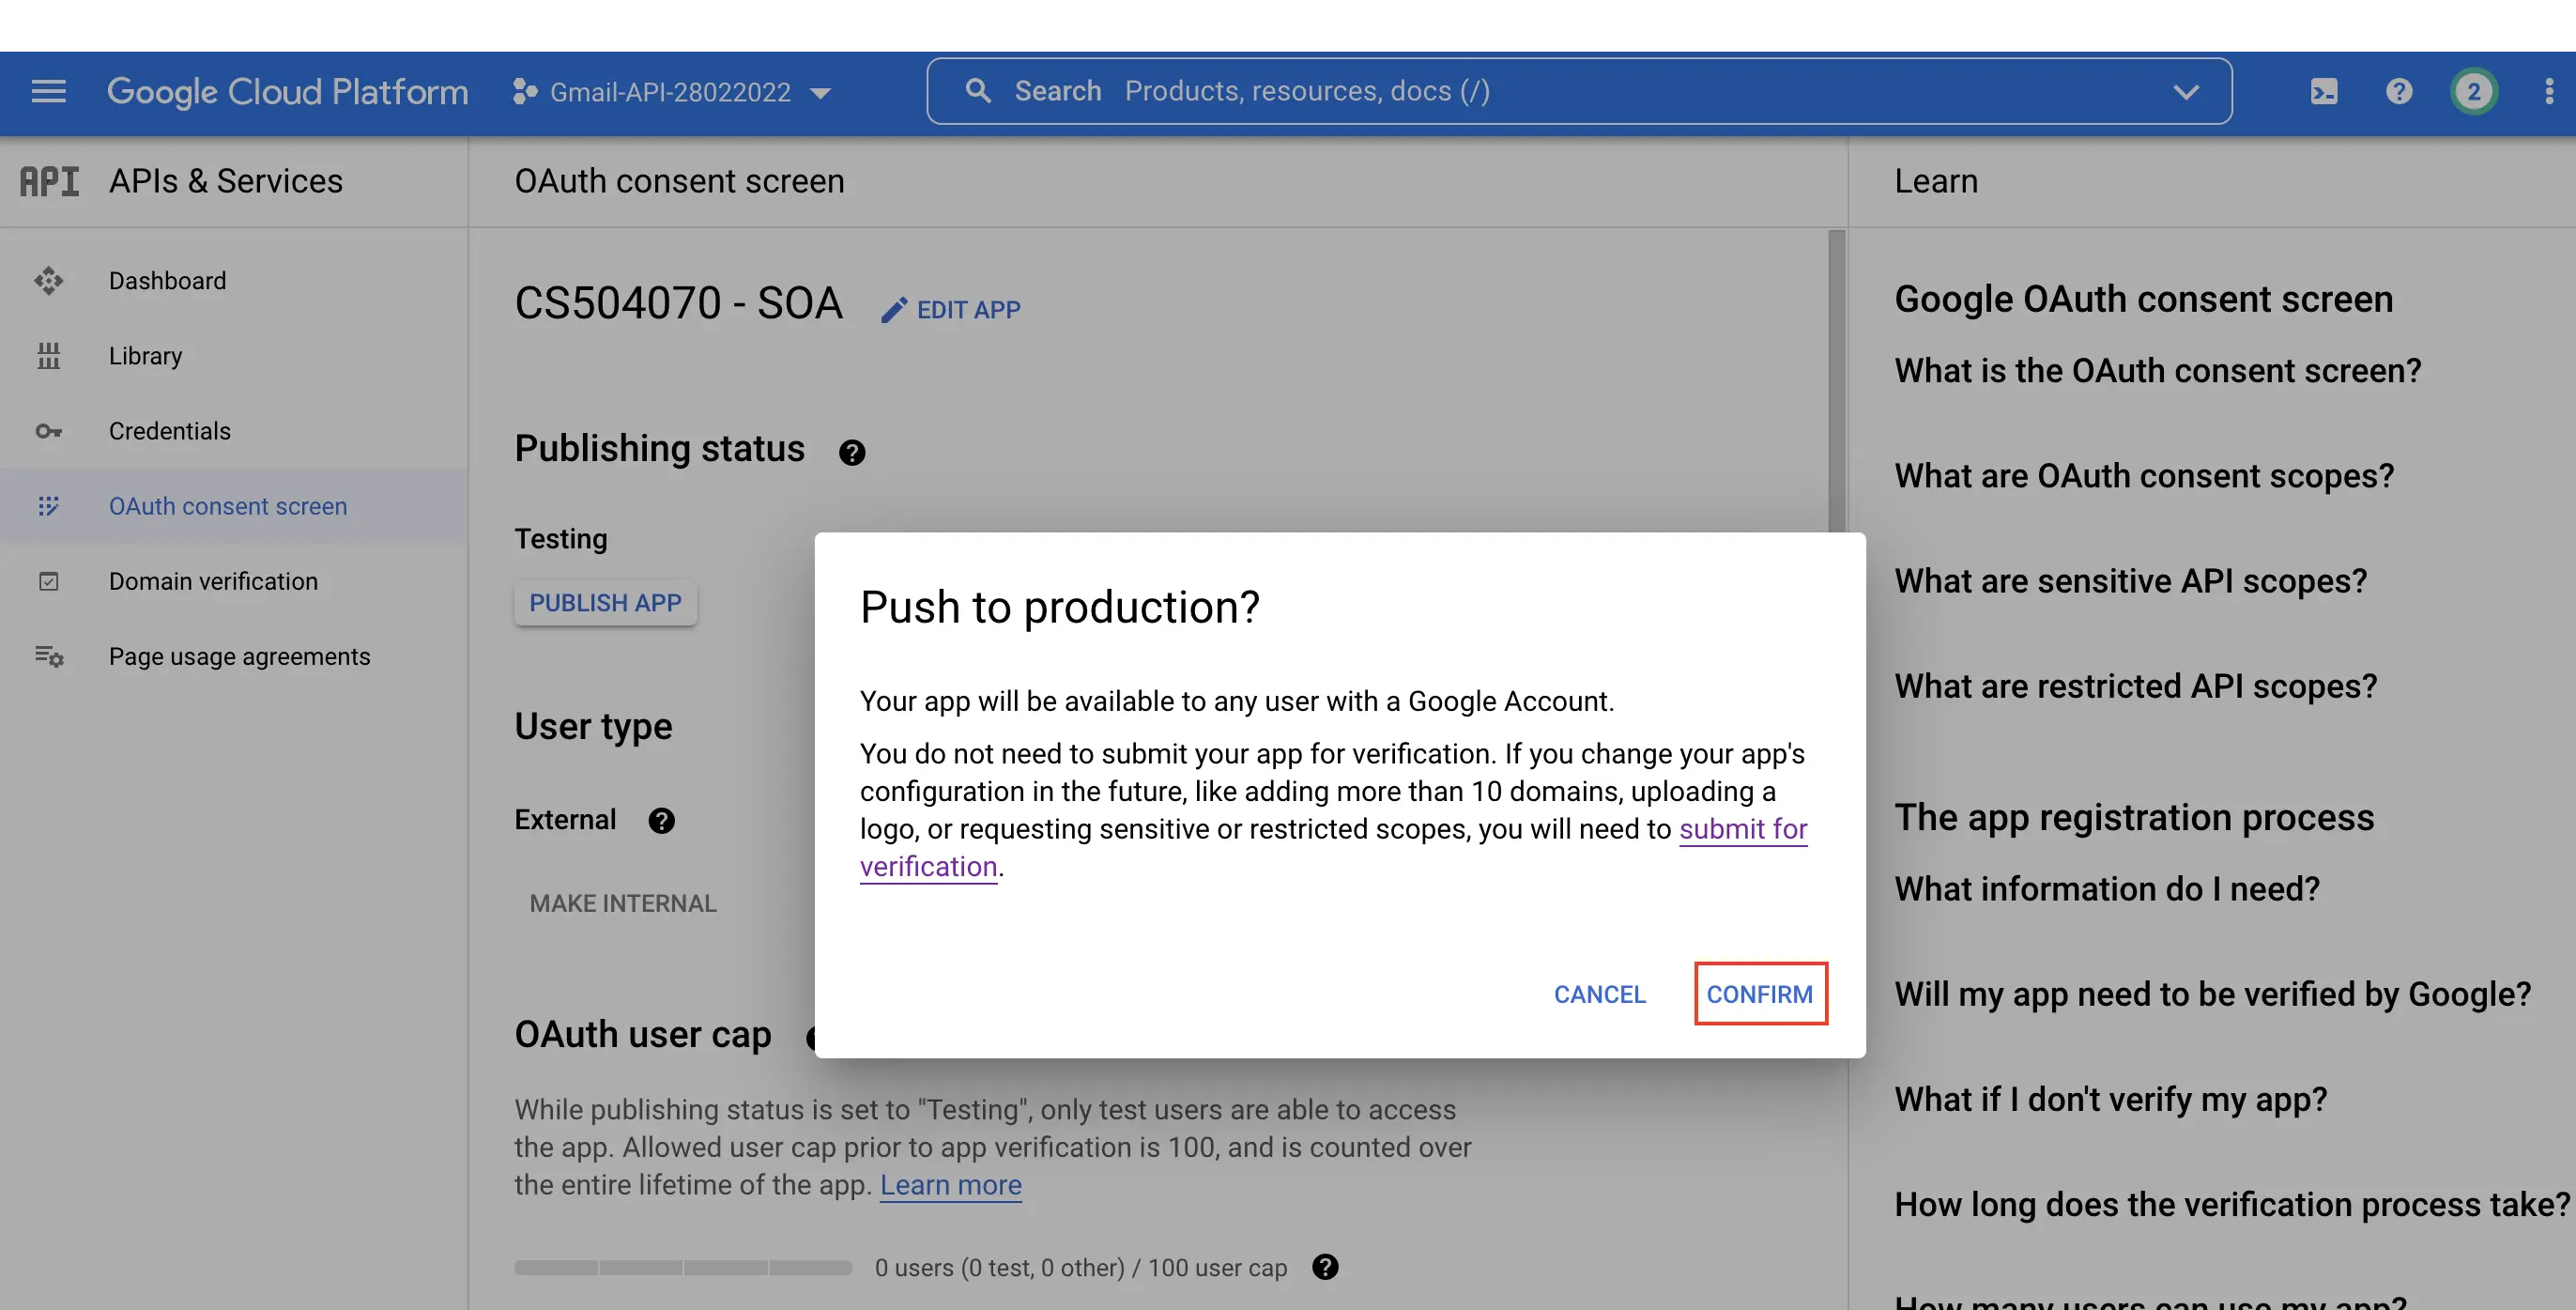
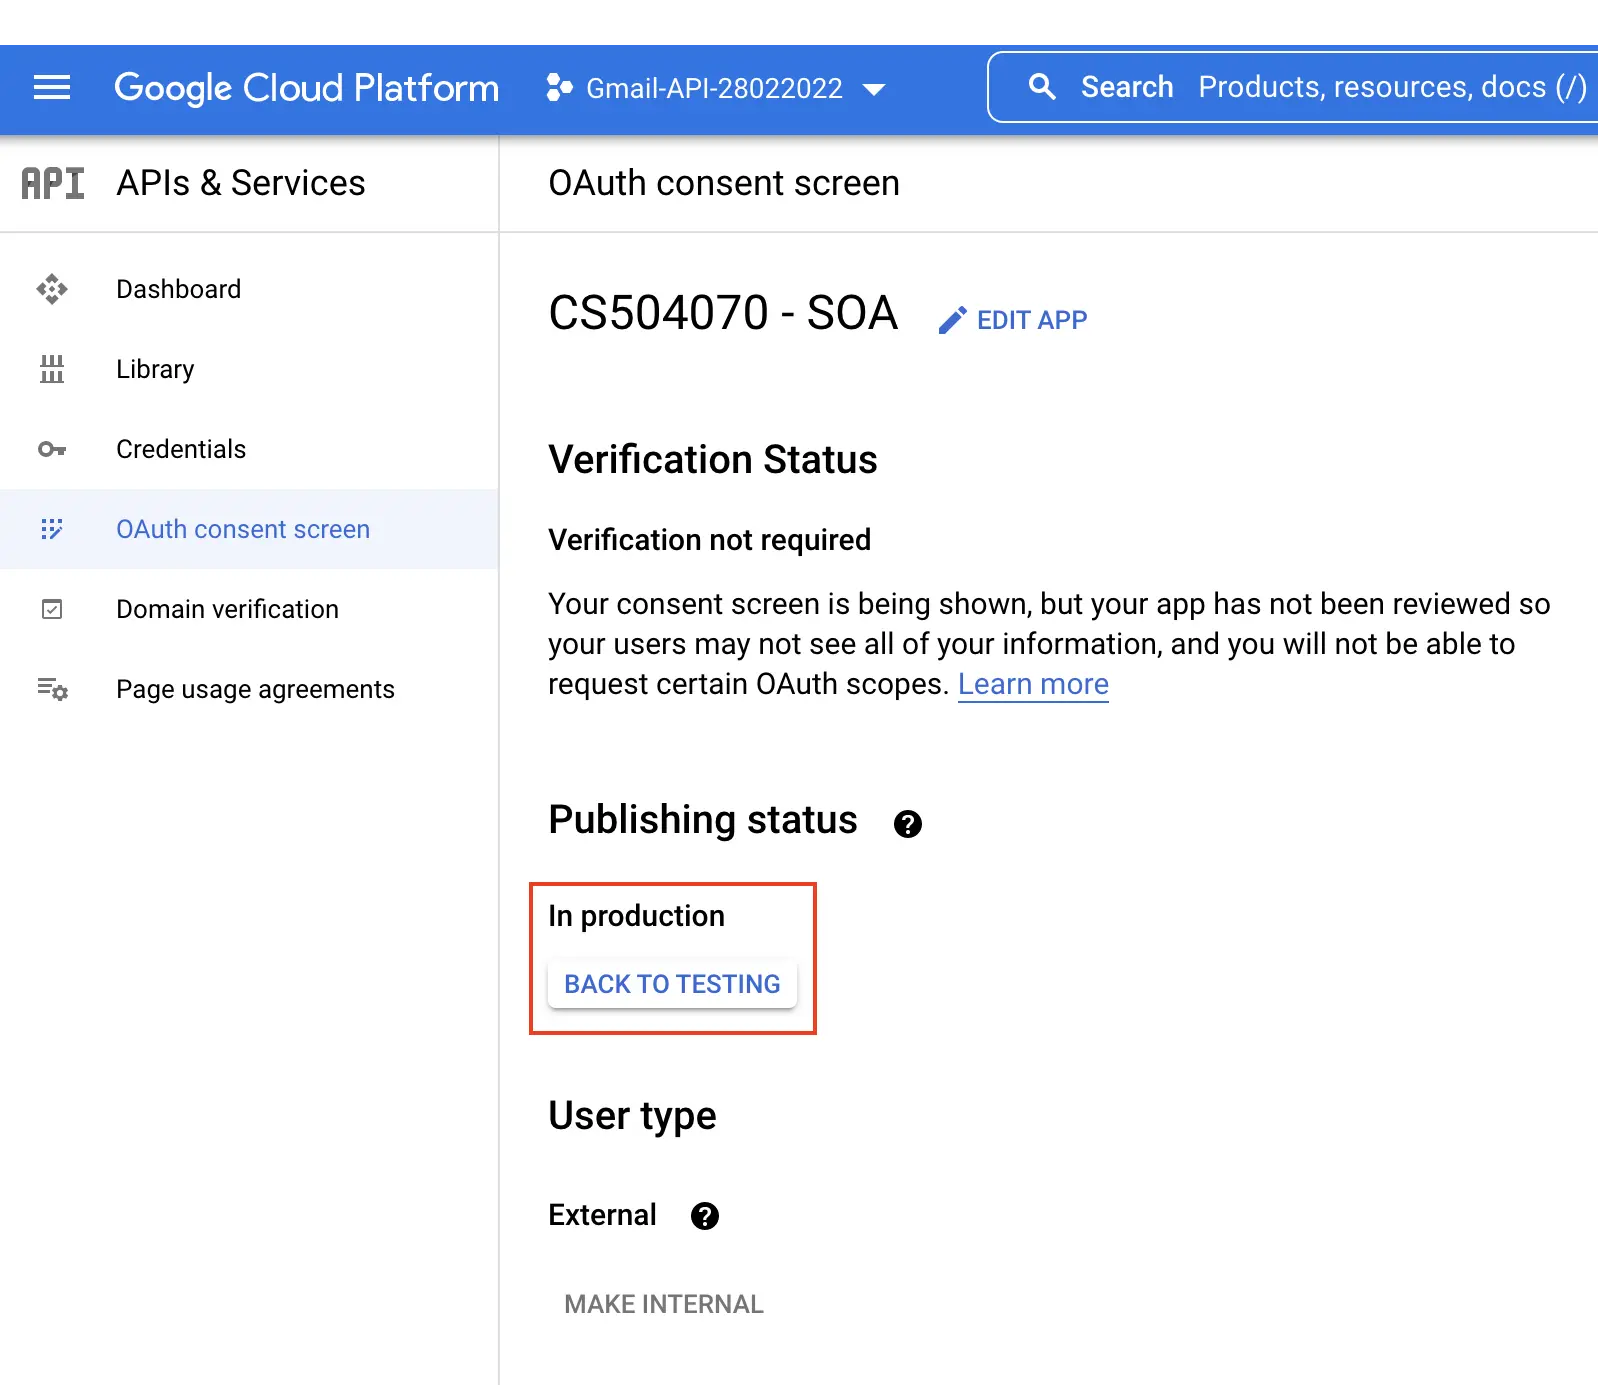
$clientIdand$clientSecret. The values of these variables can be obtained from previous step. After inserting the two values, you need to visit https://example.com/get_oauth_token.php in a web browser, if you deploy get_oauth_token.php on a local machine, the URL will be http://localhost/get_oauth_token.php. Fig. 13 shows the results when visiting get_oauth_token.php file. Next, select the account that was enabled Gmail API, as shown in Fig. 14. If you get an Authorization Error as shown in Fig. 15, you need to move to the next step to publish your application to production mode. If you use a personal Google account when enabling Gmail API, you will get an error page as shown in Fig. 16. You can click on Go to example.com to proceed to the next step, as shown in Fig. 17. You need to check the box Read, compose, send, and permanently delete all your email from Gmail. before clicking on Continue button. - Turn on Production mode — On APIs & Services dashboard, select OAuth consent screen in the left-sidebar. Then, select Publish App, a pop-up window will be opened to request your confirmation, as shown in Fig. 18, 19, and 20.
- Get Refresh Token — The last step of this section is to obtain Refresh Token, as shown in Fig. 21. This token will be used in the next section to send email from your authorized Gmail account.


2. Call Gmail API (OAuth 2.0) by PHP programming language
In this section, we will show you how to implement a PHP program to send email from Gmail server with OAuth 2.0 authentication by taking advantage of PHPMailer library. PHPMailer has many features such as supporting SMTP authentication with LOGIN, PLAIN, CRAM-MD5, and XOAUTH2 mechanisms over SMTPS and SMTP+STARTTLS transports where XOAUTH2 is the authentication mechanism used by Google.
Installing PHPMailer — PHPMailer can be installed via Composer. First, to install Composer, you need to have a PHP environemt on your machine by installing XAMPP or WAMP server. Then, you can install Composer (v2.2.7), PHPMailer (v6.6.0) and League/oauth2-client by executing the below commands on Terminal (MacOS, Unix-based) or Windows Command Prompt. We note that Composer is not available in system-wide mode, you thus install Composer and PHPMailer in your project directory.
php -r "copy('https://getcomposer.org/installer', 'composer-setup.php');"php -r "if (hash_file('sha384', 'composer-setup.php') === '906a84df04cea2aa72f40b5f787e49f22d4c2f19492ac310e8cba5b96ac8b64115ac402c8cd292b8a03482574915d1a8') { echo 'Installer verified'; } else { echo 'Installer corrupt'; unlink('composer-setup.php'); } echo PHP_EOL;"php composer-setup.phpphp -r "unlink('composer-setup.php');"composer require phpmailer/phpmailercomposer require league/oauth2-clientcomposer require league/oauth2-google
After installing all dependencies (Composer, PHPMailer, League/oauth2-client), you can now implement a PHP program to send an email based on Gmail server, as shown in Fig. 2. You should prepare the clientId, clientSecret, and refreshToken to insert to the program. Visit Resources section to download sendEmail.php file.
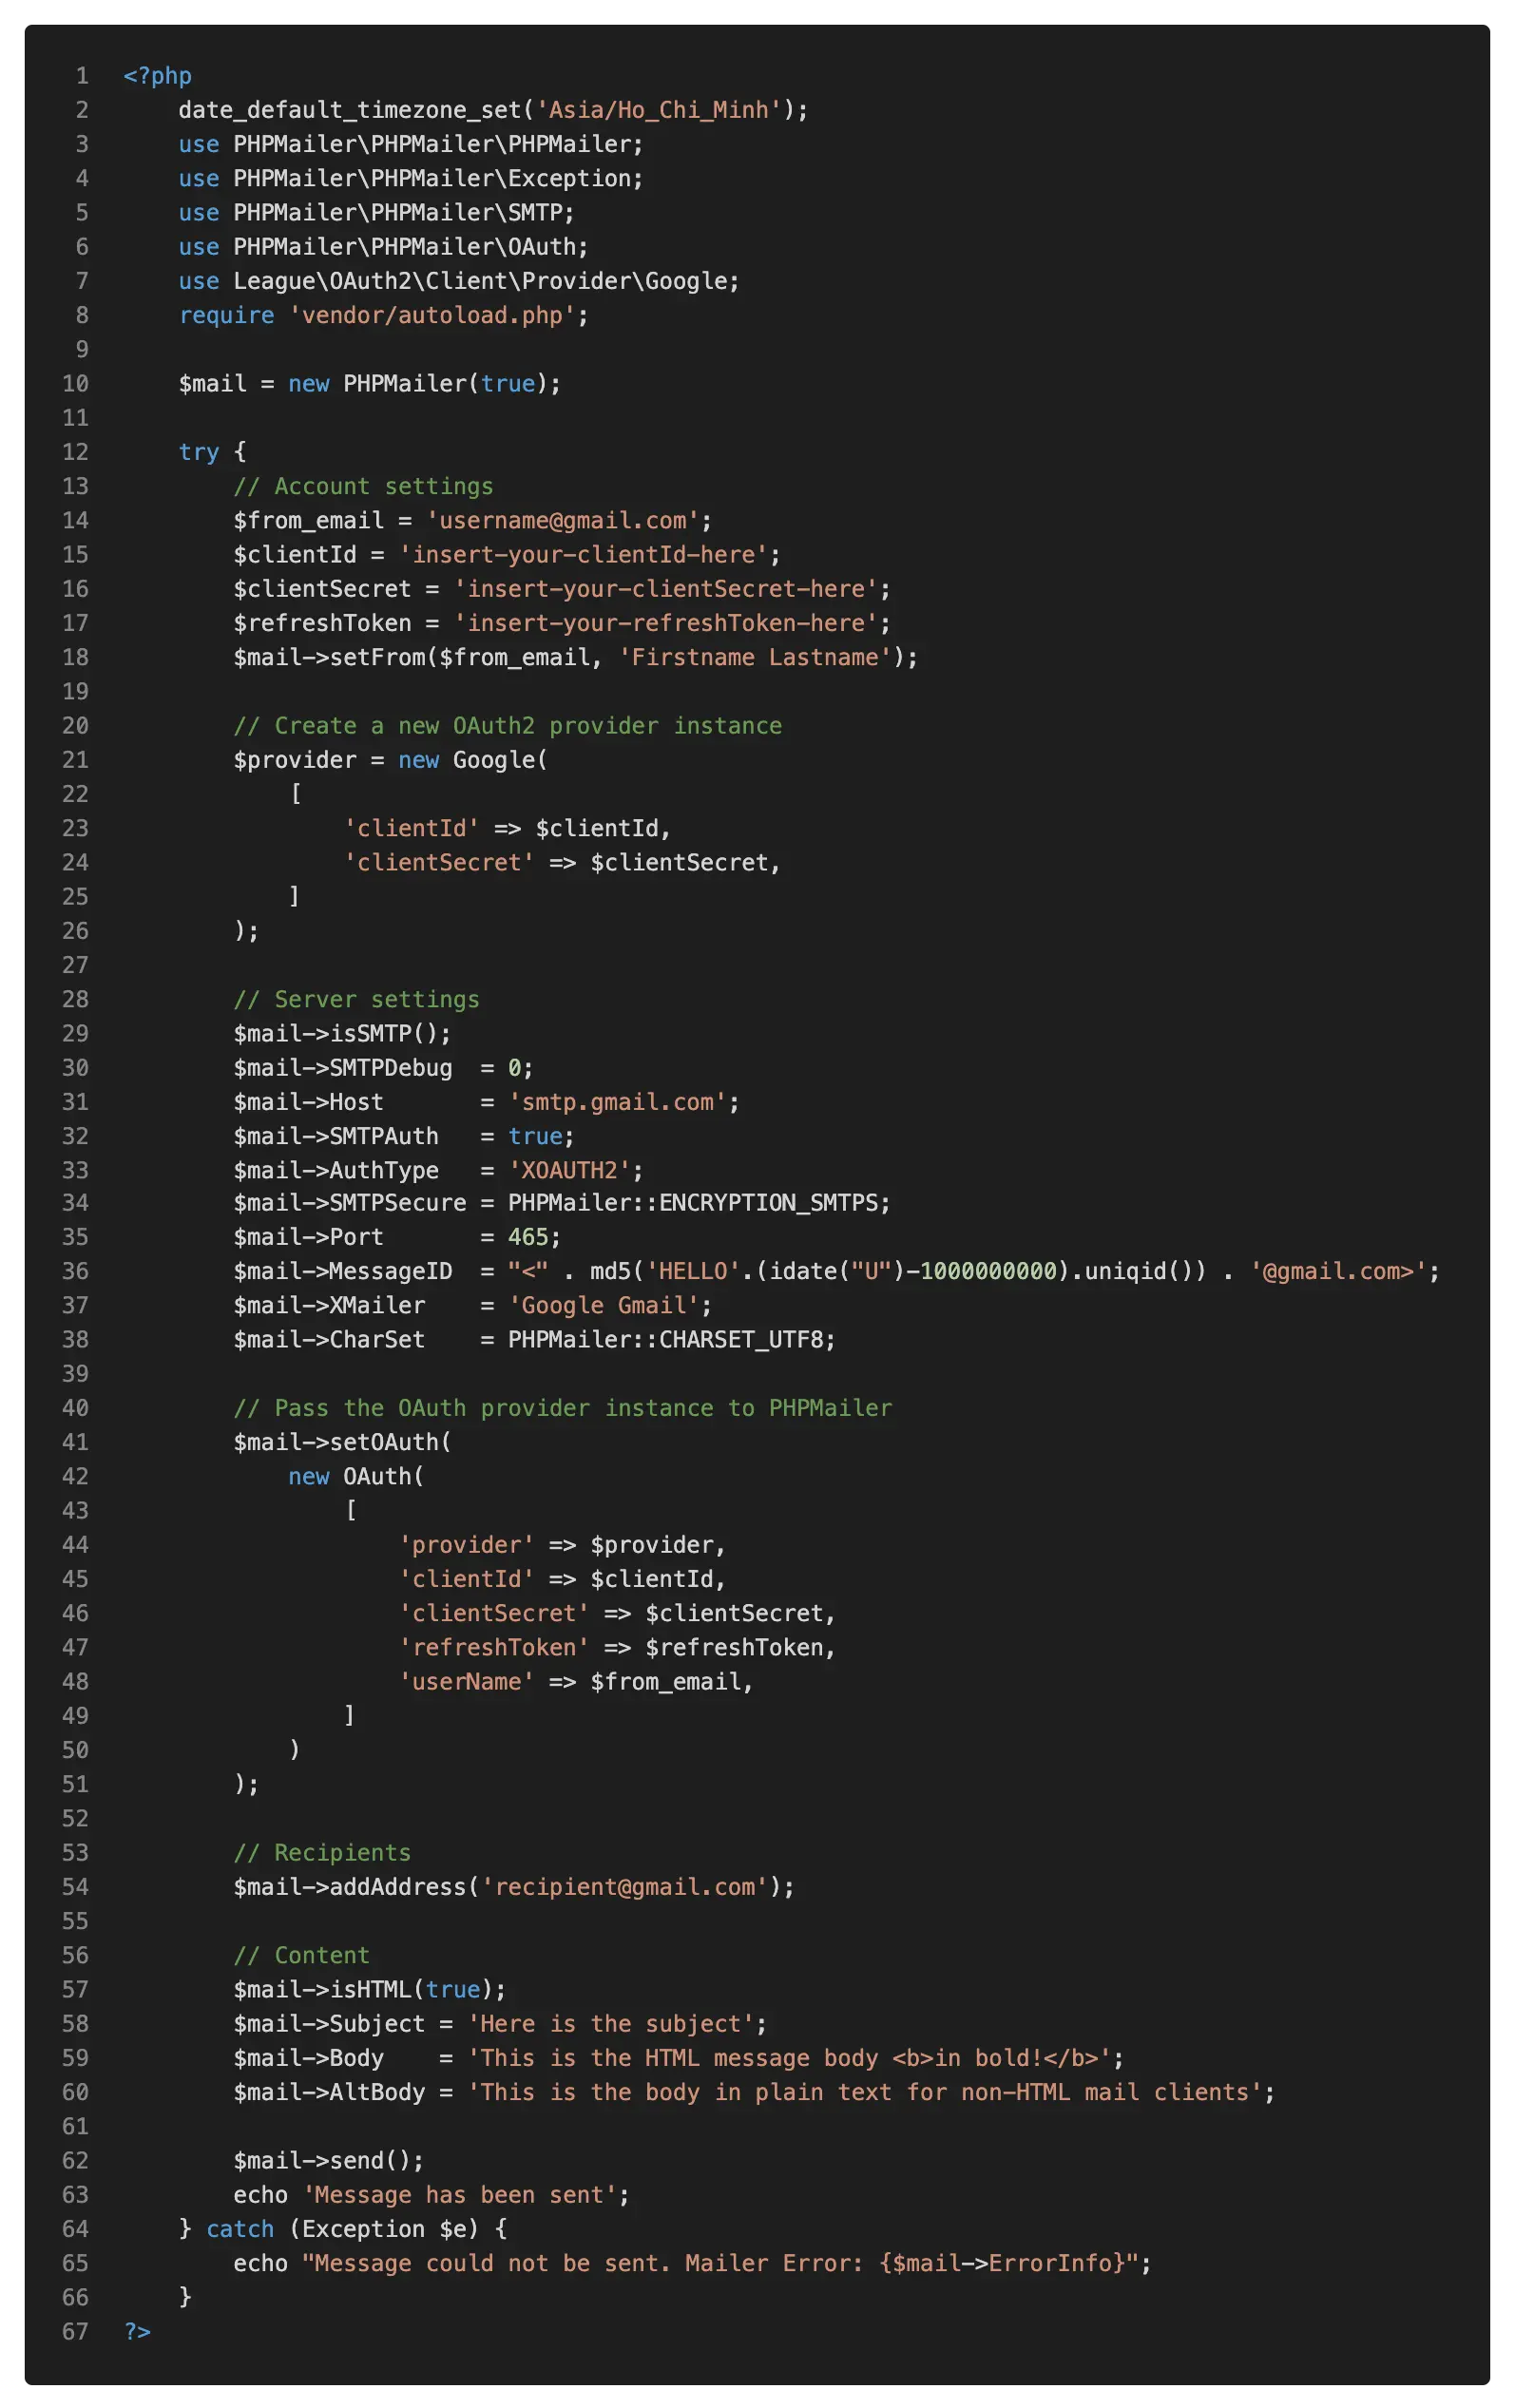
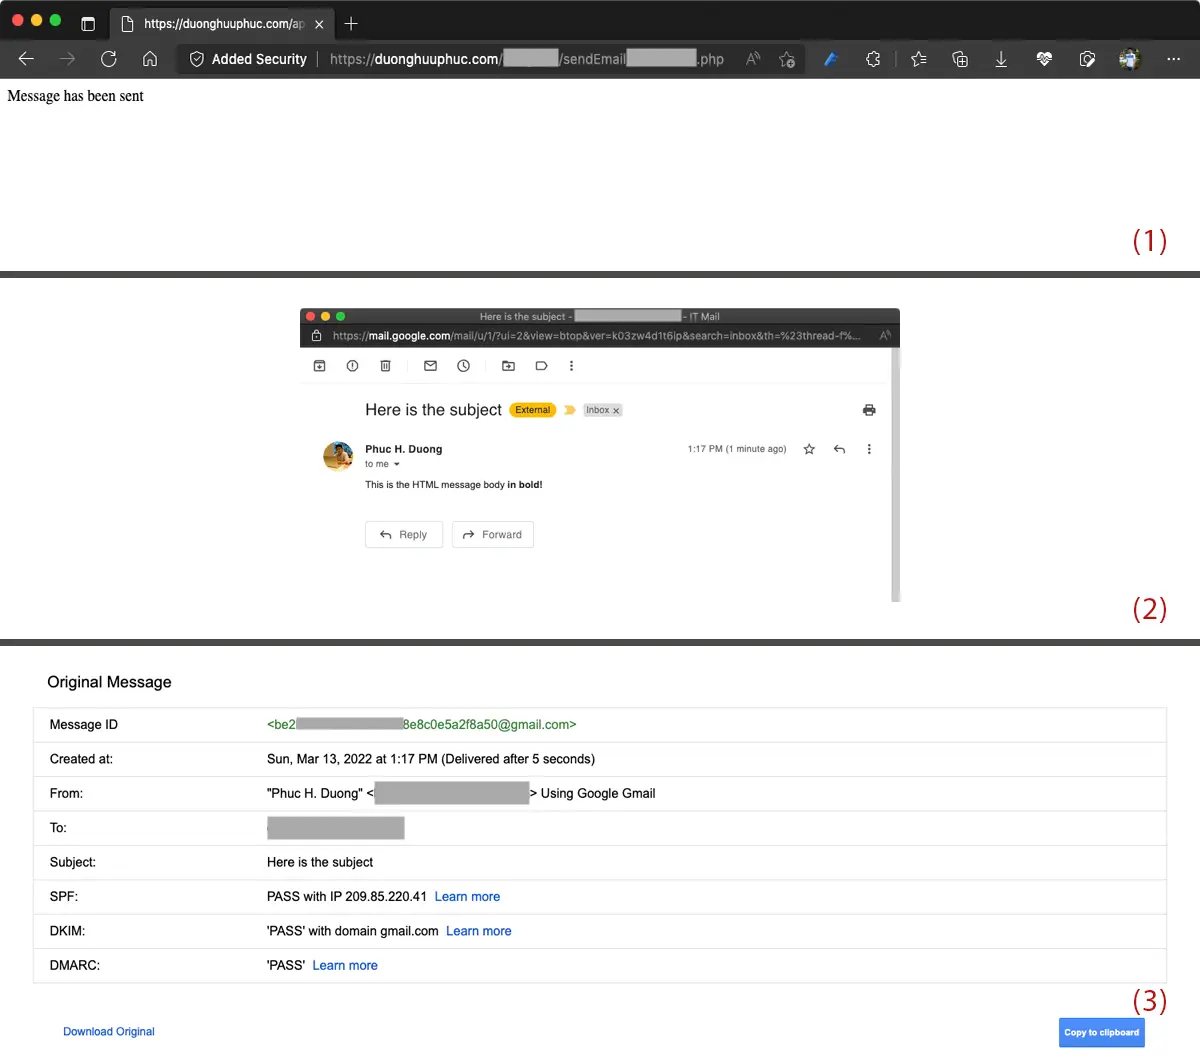
Fig. 23 shows the results when executing the sendEmail.php. In particular, section (1) shows the results when visiting sendEmail.php in a web browser. Section (2) shows the email content delivered to a recipient mailbox. And then, section (3) shows the original message (raw content) of the message.
3. Call Gmail API (OAuth 2.0) by Python programming language
In the previous section, we present the implementation of an email handler based on the PHP programming language. In this section, we will present the implementation on Flask so that you can integrate Gmail API to your application.
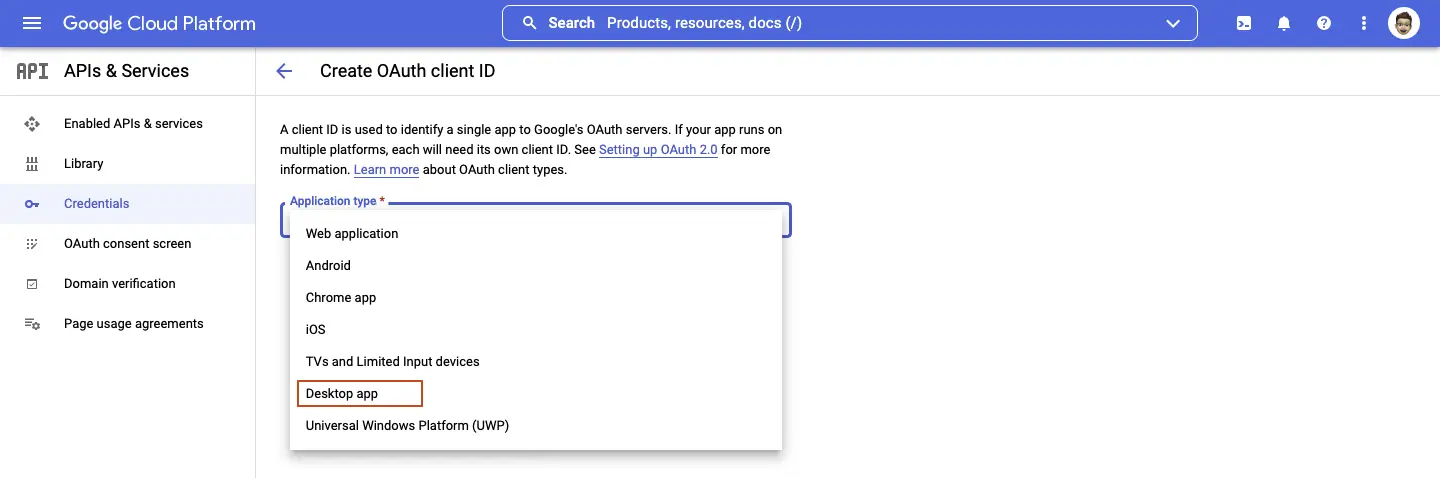
Create access credentials — You need to create a new desktop apps credential . Unlike WebApp credentials, desktop apps credentials do not require any additional information, e.g., redirect URI, to create OAuth 2.0 credentials for desktop applications. It thus can easily and directly integrate to your application. After creating a desktop apps credential, you need to download the credential file and rename it to a short one such as credentials_desktop_apps.json, and then copy it to your working directory. Fig. 24, 25 show the steps to create a new desktop apps credential.
Install the Google client library — Client libraries make it easier to access Google Cloud APIs from a supported language. While you can use Google Cloud APIs directly by making raw requests to the server, client libraries provide simplifications that significantly reduce the amount of code you need to write. Since we are working with Python, we need to install Google API Python client library by executing the below command:
pip install --upgrade google-api-python-client google-auth-httplib2 google-auth-oauthlib
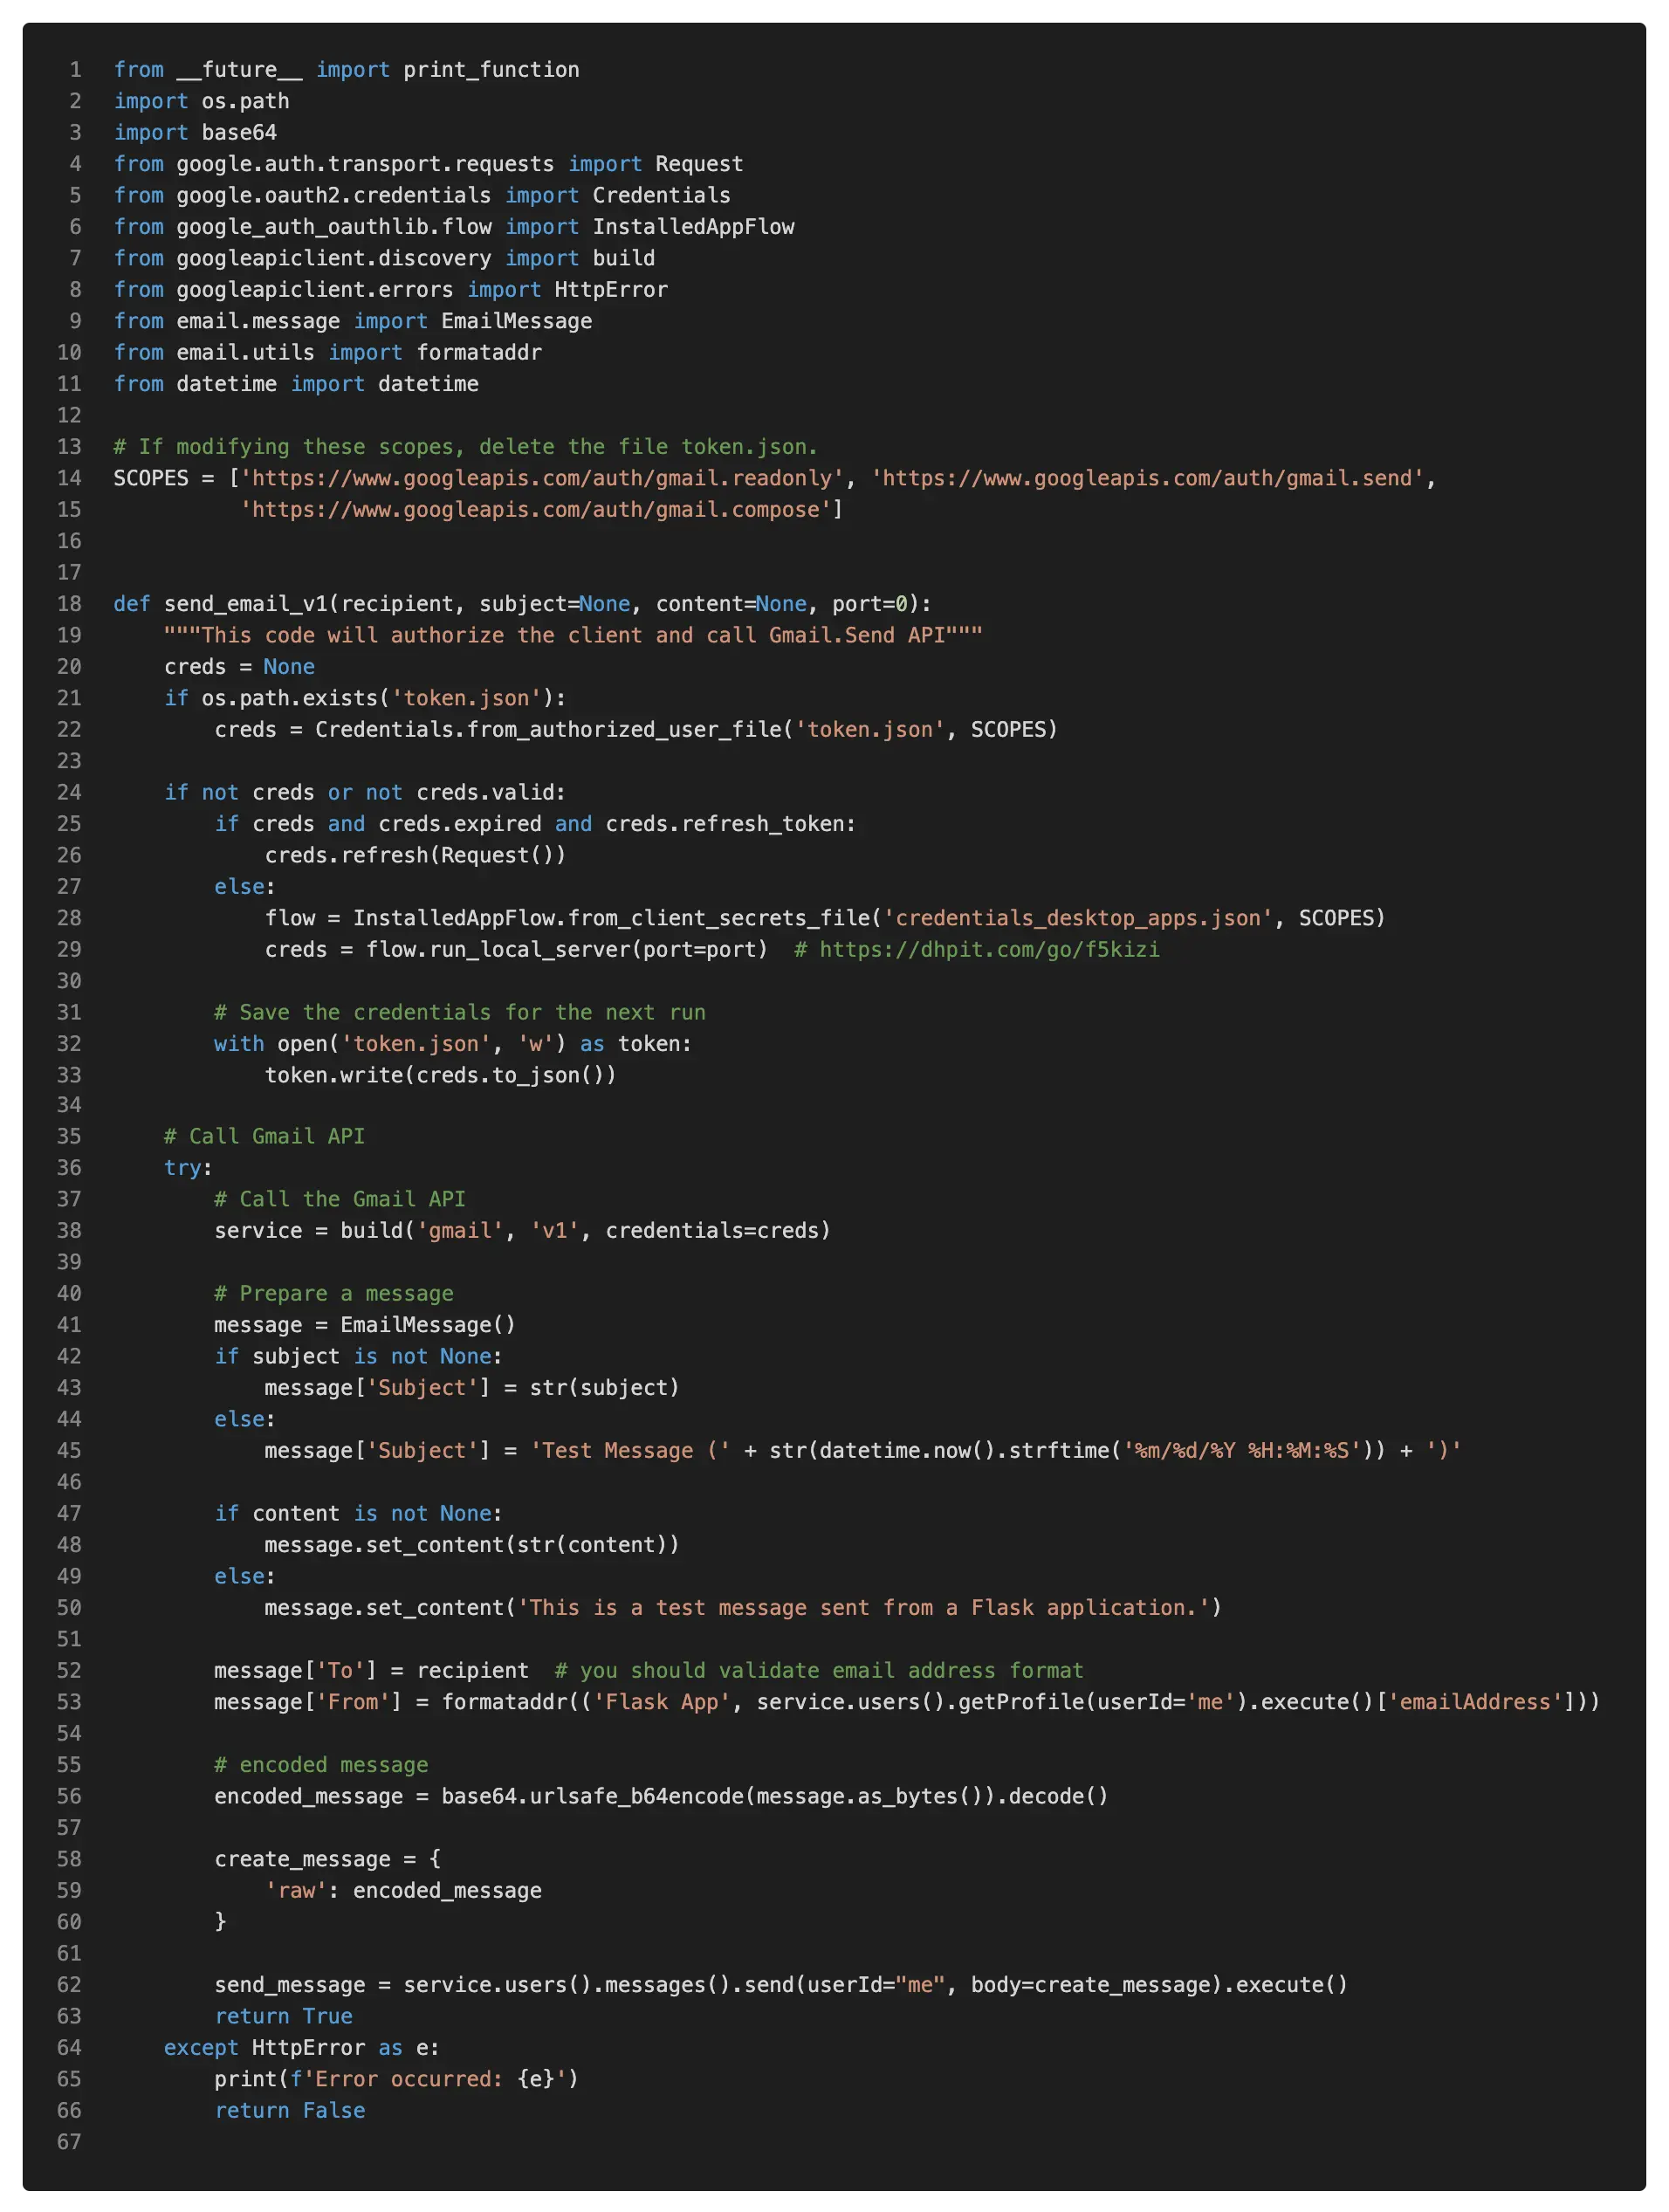
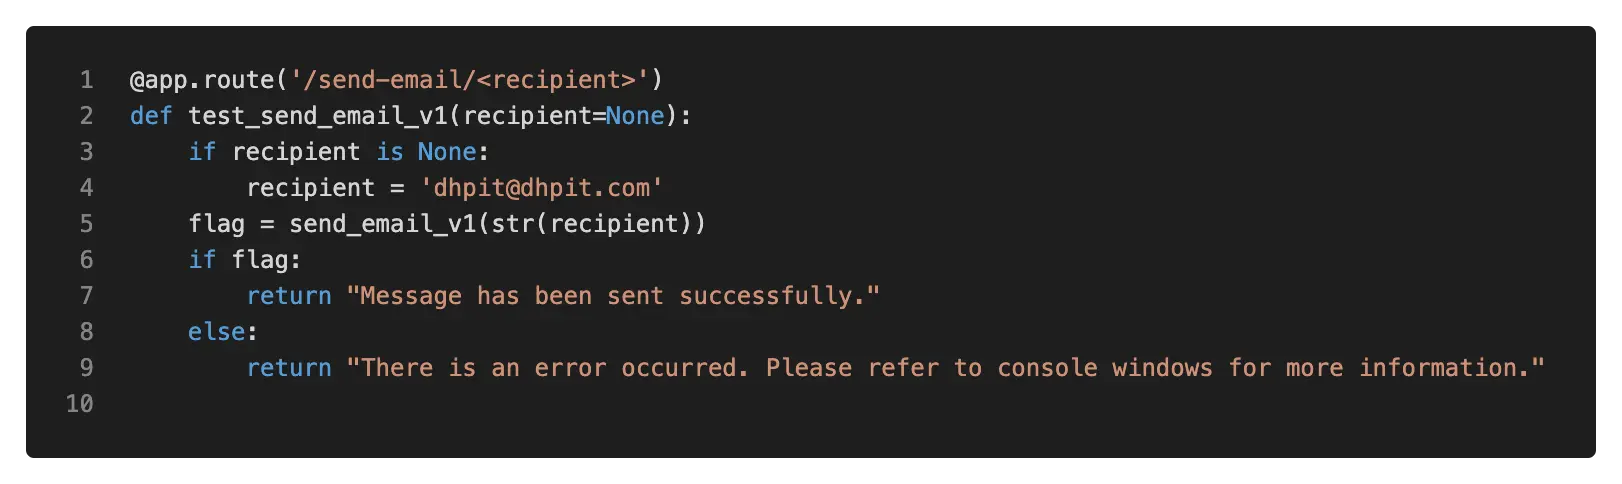
Call Gmail API — In Fig. 26, we present the implementation of a function that calls Gmail API to (1) authenticate a client and (2) send an email. With the credential file (credentials_desktop_apps.json) placed in the project directory, the file token.json stores the user's access and refresh tokens, and is created automatically when the authorization flow completes for the first time. If there are either no or invalid credentials available, the app will redirect users to the Google login page. The code snippet placed inside the try...except block will call the Gmail API to send an email message. In Fig. 27, we import the send_email package to hello.py and make the send_email_v1() function publicly available to users through the /send-email/<recipient> route, for example, http://localhost:5000/send-email/user@dhpit.com. The send_email.py file is available in Resources section.
Exercises
- Program a web form that allows an user inputs (i) a recipient email address (need to validate input), (ii) a subject and (iii) a message content. Then, the user clicks on the Send button in order to send the message to the recipient.
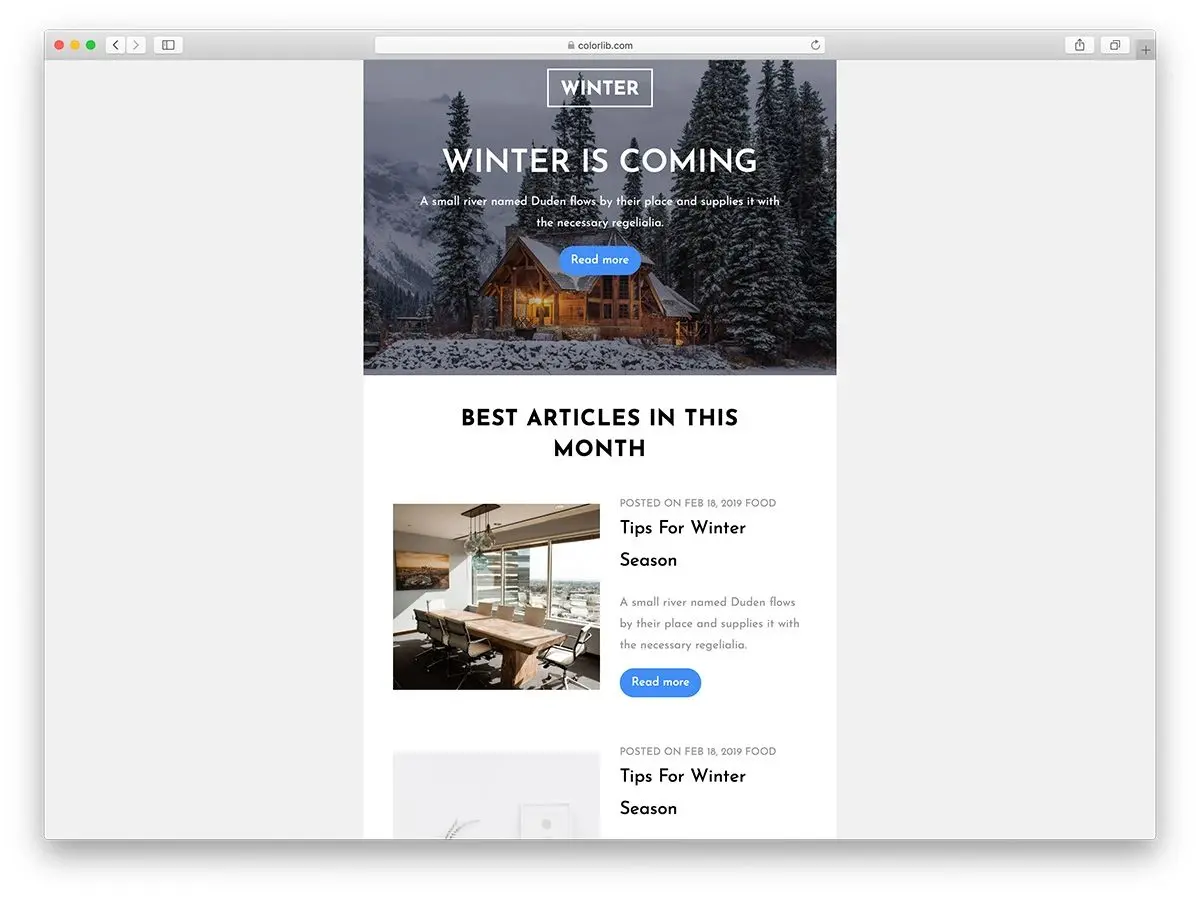
- Instead of sending a raw email format, in this exercise, you are required to embed an HTML template to your email message. For example, the below figure presents a sample newsletter email template containing latest news of a website.
- Continue from Exercise 1 and 2, in this exercise, you need to develop a database to store all sent email messages.
- Implementing a web form in order to allow a user register a forum account. The information of an account should consist the basic information such as name, gender, email, password, date of birth, nationality, and a checkbox to require a client to read-and-accept the terms of services. The input information must be validate first, and if they are valid, the information will be stored in a database. And then, an email message will be sent to the user to announce the authentication information.